Friday, June 29, 2012

Friday Favorites: Pinterest Projects and Ideas

Hello, hello!  This is Allison.  "Wait a second," you're probably thinking, "your day is Tuesday, silly!"  True.  But we're doing a little rearranging here on Five Crafty Sisters.  Life has gotten a little crazy for Katrina, so she's decided to be more of a guest blogger than a regular, here on the blog.  With two little ones at home and a third on the way, who can blame her?  So we'll be playing around with Fridays for a bit, while Shauna moves her posts to Thursdays.

As our Etsy shop has now opened (http://www.etsy.com/shop/fivecraftysisters, in case you were wondering), we may occasionally do a "Friday's Market" to introduce new items in the shop.  Other Fridays may be posts from Katrina, or maybe our other sister-in-law or sister will want to add their craftiness.  We'll see if we can recruit them.  :)  But for today, we're going to play around with "Friday Favorites".  Today we will each share our favorite Pinterest/Internet finds.  They may be projects we've completed, or maybe a project inspired by something we saw online.  We may also decide to share a project that we're currently working on.  It's up to each crafty sister to decide.

I'll go first.  This is kind of cheating, right off the bat.  I guess I'm the rebel in the family.  :)  This is actually a project my husband, Brent, completed.  But I found a pin on Pinterest that will hopefully solve a problem I've been worried about.  My husband started wood working this year and has really enjoyed working with his hands.  He made this amazing bench for our kitchen table and started working on a toddler bed after we found out I was pregnant with baby #2.  I love this little bed!  He has really enjoyed Ana White's website found here which provides the plans and the supply lists for countless projects.  I've seen a ton of her stuff on Pinterest, and think she's my new hero.  Anyway...  I love this bed, and Isla does too.  Way to go, Brent!  Isn't my husband the best??  :)  (Did you notice the adorable quilt my mother-in-law, Linda, made?  Love it!)

So one of my fears with this bed, was that we wouldn't be able to easily add a guard rail for Isla to use until she got used to sleeping in a real bed.  I could just imagine all the drama of her falling out of bed in the middle of the night.  But then, I found this amazing idea on Pinterest: put a swimming noodle under the fitted sheet on the edge of the mattress.  It will serve as a bumper if your toddler gets too close to falling off.  SO SMART!  It was a total aha moment when I saw this pin.  I haven't tried it yet (as we're leaving Isla in her crib as long as she'll let us), but I definitely plan on seeing if it works.  Pinterest hasn't failed me yet, so I'm sure it will solve all of my worries.  :)  Okay... which of my amazing sisters is next?

Allison
http://pinterest.com/allisonlacey/
 .................................................................................
 Hello there! This is Shauna.  I know you all have missed me since yesterday.  Today I want to get serious, and talk about something personal.  I have a problem.  My friends and family all know about it, and now I think it's time I share with you...I really like cats.  A lot.  I'm about five cat calenders away from being a crazy cat lady.  It's pretty scary.  Lisa's youngest, after forgetting my name, once referred to me as "the aunt who likes cat".  Well now that you know, I can be open about my cat crafting. Get ready for this. 

A few months ago I realized we really needed new pot holders.  We were barely surviving off our old tattered wedding gift pot holders, and I wanted a cheap way to vamp up the look of our kitchen.  Then I saw these pot holders off of  www.purlbee.com  and I fell in love. 


I loved how modern and unique looking they were.  So I decided to pull out some fabric my friend Bethany gave me and put my own twist on it.  I am kind of obsessed with them. 


I used the cat fabric on one side and gray neutral on the back.  I like to mix it up sometimes when I get sick of the cats.  One of these I really messed up on...I added the hoop onto the bottom instead of the top of the pot holder so the cats are upside down when I hang them up. 


I decided instead of sewing only a couple lines to hold together the batting on the pot holders, I decided to sew random lines all over the pot holders to give it some style. I hope you enjoy cat pot holders.

Shauna

....................................................................................................................................................................
Hello there!  Lisa here.  Just for the record, Shauna is a cute kind of cat lady not a crazy kind of cat lady!!  And Allie, that is a fantastic idea for a bed.  I was always worried about my babies falling in that crack between the mattress and the wall!  Smart!

For my project idea, I thought I would show you something I made awhile ago to hold my calendar and little notes and pictures for and from my sweet children. 

Calendar and little heart man is courtesy of my baby.  He's such a little sweetheart!

I thought I came up with this idea but once I joined Pinterest, I realized that there are very few original ideas, including mine!!  I had a large picture frame that I took the glass out of and painted to match the trim in my house.  I then took some cork tiles I found at Hobby Lobby and glued them to the back of the picture frame.  Super easy and a nice way to not feel bad about throwing out something perfectly useable!  And, bonus, it keeps the front of my fidge a little cleaner!!  Winner!

Lisa

***************************************************************************************************************************************

(Sara posted what I'm sure was a great post, but for some reason, it didn't save.  Look for it next week!)

Thursday, June 28, 2012

Shauna's Post: Getting into the patriotic spirits with simple crafts


I love holiday decorations.  I have very fond memories of coming home from school to see my mom put up the fall or Christmas decorations and instantly falling into the spirit of the season.  I feel like holidays like the 4th of July can be fun with smaller or simple decor, which is why I love my sisters crafts so much.  I wanted to keep these crafts family and budget friendly so I used things that I already had around the house.  I made a Patriotic Tea Towel and a Mason Jar Vase with patriotic flowers. 


Patriotic Tea Towel Tutorial.

The star tea towel is such a fun and easy craft you could easily do this with your children...I say your children because I definitely didn't do it with mine.   Haha I'm not quite ready for that type of adventure with my almost 2 year old.

For this project you'll need some type of tea towel, a knife, a potato, red and blue paint and probably a paper plate for the paint. 


First you'll need to cut the potato in half, and then cut out a star.  I used a pencil and drew a star before I started cutting.


Then you just dip your star into the paint and stamp.


I washed of my potato stamp and started the red and this is how it turned out.  I really loved the simplicity of it, and how it got me in the mood for the 4th.


And here is the end product.  My boys really love it for some reason.  I can't seem to keep it on the oven door because they always run around the apartment with it screaming "Stars!!". 


Mason Jar Vase with patriotic flowers
For my next project I just decided to do some color blocking on a mason jar, make some paper flowers and set in on our bookshelf.  It's a pretty subtle 4th of July look but I really like it.
To get started you'll need a mason jar, white paint or spray paint, duct tape or electric tape.  For the paint I used a Martha Stewart all purpose paint that was on clearance at Michaels for a buck, but looking back I would have used spray paint. 


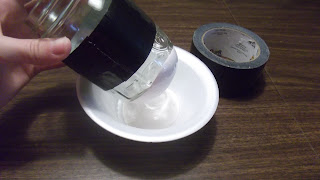
 So to start it off poor a generous amount of paint into a bowl.  Make sure your mason jar is clean and dried.  Put a strip of duct take on the jar and dip the jar in the paint. 


 After you've dipped the jar, place it upside down to dry.
 I added some red and blue paper flowers I made to the vase for a patriotic look and I think it turned out great. 


And here is the finished product, the first thing people see when they walk into our apartment.


Wednesday, June 27, 2012

Sara Jane: Fireworks and a treat


Hello hello hello!

I love the Fourth of July.  Not only do we get to celebrate this spectacular country of ours but we get to blow things up.  Who doesn't enjoy doing that???

For my craft  you will need:


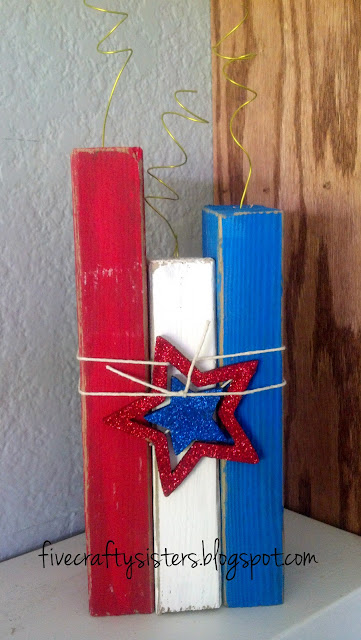
Wire cutters, wire (I used 22 GA), twine, paint (red, white and blue), a fancy star, sandpaper and wood.  The wood can be any size you like.  I used an old 2 x 4 piece of wood I found at my in-laws house and cut it into 3 pieces - a 10 inch, an 8 inch and a 9 1/2 inch piece.  (AND just in case you're wondering....I CUT the wood.  This is huge for me because I usually just have my hubby do all the work when it comes to power tools.  I'm now looking forward to my next project.)

First, paint your wood.  I like a more distressed looking piece of wood so I only did one coat.  If you want a more solid color, do two or more coats until it looks how you want.  Again, since I like the distressed look, when the paint was dried, I took a piece of fine sandpaper and lightly sanded the corners.

Next, I cut three pieces of wire.  I first tried the silver wire but you could hardly see it so then I tried the gold wire and it was exactly what I wanted.  Each piece of wire is several inches long.  I cut it long enough to be able to manipulate it and still have length.

Next, I drilled 1 hole in the center of the top of each block of wood.  Each hole is approximately 1 inch deep.  Use your smallest drill bit when doing this.  When your hole is done, stick the wire in.  If you are having a hard time getting it to stand up, maybe try a small dab of hot glue.

Finally, wrap your twine around the blocks of wood and decorative star.  Does it look something like this....


 Finally, everyone (except my Penelope) loves to watch fireworks, right?  Why not have a tasty snack while you are enjoying your Fourth festivities.


Simple Caramel Popcorn

This recipe is a favorite for movie night at my house.  The best part about it is that there is always left over caramel to be used to dip apples in, drizzle over a yummy spice cake, or to just eat with a spoon, like I do.  I know a lot of people like the kind of caramel corn that is baked in the oven.  If you are one of those people, this is probably not the recipe for you.  This caramel popcorn is a delicious mess.  My kids usually end up having sticky hands, faces and hair when they are done with this treat.  We like a good mess around here.

Enjoy!  

Ingredients:

1/2 cup butter
2 cups packed  brown sugar
1 cup light corn syrup
2 T water
1 (14 ounce) can sweetened condensed milk
1 T vanilla extract
3 bags of microwave popcorn.

Directions:

Pop popcorn.  I tend to use microwave popcorn because it is so convenient.  Use light butter flavor.  The full butter flavor just is too much with this recipe.  If you want to use air-popped, it tastes just as yummy :)

Combined all ingredients, except vanilla, in a large sauce pan over medium high heat.  Stir until butter melts.  Watch the mixture carefully as it can burn quickly.

When the mixture comes to a soft boil, continuously stir for 3 minutes to dissolve the sugar.

Take the pan off the heat and add vanilla.  Stir until combined.

I have found that the easiest way to combined popcorn and caramel is to do it in a LARGE pan.  I like to use my roasting oven pan.  That being said, pour 2 cups of the caramel over the popcorn and mix with a large spoon (I use a spatula...easier to clean).

Save remaining caramel in an airtight container in the refrigerator.  It saves pretty well for a few weeks.

*NOTE*

Most of the recipes I make are kid friendly in that the kids can help make them.  THIS IS NOT A KID FRIENDLY RECIPE!  Please make sure you know where your little ones are when you are making this recipe (and whenever you are using the stove/oven).  The caramel is so hot and can do some major damage in very little time.

Happy Fourth of July!

Sara Jane

Tuesday, June 26, 2012

Allison: Patriotic Treat and Kids' Craft


I LOVE THE UNITED STATES OF AMERICA!  It's true... I consider myself to be a very patriotic person, and LOVE any holiday that celebrates my country.  I lived in Spain for 18 months as a missionary for my church and didn't realize just how much I loved my country, until I was away from its soil.  Every time I would see an American flag, I would get emotional and instantly homesick.  That being said, I'm excited to share a patriotic-themed dessert/appetizer recipe and kids' craft with all of you today.


I took my inspiration for these cute little cupcakes from here.  I loved the idea of a bite-sized dessert that wouldn't be TOO messy.  They were surprisingly easy to assemble and even easier to snack on in the process (tee hee).  Here's what you'll need:


Duh.  You could probably figure out those ingredients.  But I'm going to share the whipped cream cheese frosting recipe that I discovered, and you are going to thank me (or curse me)!  Of course I found it through Pinterest, on this site , as a cinnamon roll topper.  I may never make another cream cheese frosting again.  It is amazing!  I had to stop myself from sampling it too much, before it was all gone.  This would work great for a standard size cupcake too, but I liked the idea of a bite-sized treat, so I used the mini cupcake tin.  The adorable little pinwheels I found in Target's dollar section, and worked great to secure the stack.  I love them!


Here's the frosting recipe:

Ms. Humble's Whipped Cream Cheese Frosting

16oz cream cheese, room temperature
1 1/2 cup powdered sugar
1 teaspoon vanilla
1 cup heavy cream, cold

Beat the cheese, sugar and vanilla until smooth and fluffy. In a separate bowl, beat the heavy cream to nearly stiff peaks, then add the whipped cream into the cheese mixture and quickly and briefly beat to combine. Do not over beat.


Mmmm... So good...


This patriotic craft came from a cute blog I came across called "Random Thoughts of a Supermom".  This mom is so creative and I loved that she involved her kids in the project.  I planned to replicate her version of this windsock but wouldn't you know it... I got lazy.  So instead, I thought I'd share my version.  Maybe not AS cute, but still a little cute and definitely kid-friendly.

You'll need these things:

* blue plastic cups
* red & white crepe paper
* tape
* star stickers


This little guy was so easy to assemble!  I just taped alternating red and white crepe paper to the inside of the cup, and poked a little hole in the top to string some white ribbon to hang it up.  Next, grab your star stickers and stick them on.  Done!  I didn't think my two-year-old could handle this yet, but I think this craft would be so fun for kids!


The blog I "borrowed" the idea from used empty baby formula canisters and spray painted them blue.  She also used ribbon instead of crepe paper.  Either way, I think they're a great way to decorate the outside of your house for patriotic holidays.  

Before I end this post, I wanted to advertise to our faithful readers and friends the special I'm offering this week on our Etsy page.  I'll be selling my 9" Patriotic Rag-Tie Wreath until the 4th of July for only $10 (instead of the $15 it sells for on Etsy).  Any local orders can be hand-delivered also, saving on shipping.  For any out-of-state orders, I'll give you a discount on shipping (only $3, instead of $5).   Message me or leave a comment and I'll create a posting for you where the discount is applied. 

Get your wreath now!!  :)


Well, I hope you enjoyed my easy dessert and craft!  Even more, I hope you enjoy celebrating our freedom this 4th of July.  May we always remember those that have fought and continue to fight for that freedom.  Happy Independence Day!!


Allison


Monday, June 25, 2012

Lisa: Fourth of July Celebrations!

Hello all and welcome to a new week!!  We are working on all things having to do with The Fourth of July this week.  For our Fourth of July celebrations, we invite all my husband's family over for water fun, a BBQ and fireworks.  We have a very large grassy area that works for accommadating large number so it is perfect.  I have table decorations planned but I thought this year would be fun to spruce up our yard with decorations!  So for this week, I am doing star decorations for the flower beds. 

These are super easy and take a very short amount of time to make. 


Supplies:
Wooden stars
Patterned paper
Wooden dowels
Mod Podge
Sponge brush
Paint
Wood glue

Steps:
1) Lay out the stars and paint the desired color.  Let dry.
2) Trace star shape onto the back side of the paper.  Cut out.
3) Paint a layer of Mod Podge onto the dried, painted star.  Place the cutout star shape on the painted star and smooth out any wrinkles that appear.  Allow to dry.  Paint a top layer of Mod Podge onto the paper.  Let dry.
4) Drill hole into bottom of the star that is wide enough for the dowel to fit.  Cut dowel to desired length.  Place a small amount of wood glue into the drilled hole.  Insert dowel and allow to dry. (Or you can do what I did and skip this step altogether and just tape the dowels on!! I ran out of time!)


Done.  I think this will add a little fun to our outdoor party without me (I mean my husband) having to get up in the tree and string decorations.  Very nice!

Lisa

Friday, June 22, 2012

Shauna: Clark's Captain America Party

Recently we celebrated Clark's 3rd birthday.  At first I wanted to make it into a little ice cream party and make it really pretty and cute, and then I realized I was making a party for me, not Clark, so I turned it into a Captain America Party.  I created this little graphic taking my inspiration from this adorable Thor party, and ran with it.  I can't tell you how easy this party was to put together.  Captain America and red, white and blue are the easiest theme for a little birthday party with the 4th of July coming up.


For this party I just picked up some patriotic balloons at the dollar tree, bought some star-shaped marshmallows to top some blue cupcakes, and made some taffy for party favors.  We were going to have the party at the park, but we got rained out so we had it inside instead.  We had a lot of fun, and I think Clark really loved the party.