Wednesday, October 31, 2012

Allison: Tutu's and Superheros

Hello, again and Happy Halloween! I've been having so much fun preparing my kids' costumes this year. For Isla's first two Halloweens, Old Navy did all the work. But I really wanted to make something special for my girls this year. I grew up with an amazing mother that always made our costumes, and I'd love to carry on that tradition.

My older daughter has been completely obsessed with Tinker Bell for awhile now, so this costume was a given. I'd seen multiple tutu tutorials on Pinterest, and thought I'd give it a try.  I love the tutu that Sara shared on this post.  I followed the tutorial found here and only made a couple of adjustments. I used my ruler and mat to make the cutting of the strips a little easier. Tulle can be hard to work with, but this method made it more manageable.


I also alternated colors to add more dimension. I definitely recommend putting the elastic or ribbon on the back of a chair while you tie the tulle. This was very helpful and made the work go pretty quick.  Just be careful not to stretch the elastic too much, or you'll end up having to cut it down.  Overall, I love how it turned out!


To finish off her costume, I made two small tulle puffs to tie to her shoes, and bought a pair of white wings. The hardest part of the project was finding a green shirt to match. After looking at multiple stores, I decided I'd have to dye a shirt myself. I had never used RIT dye, but figured it wouldn't be too hard to figure out.  Once I discovered this site, it was a piece of cake, and came out the perfect color.

She looks a little dazed, but you get the idea.  :)

For Norah's costume, I kind of cheated.  I saw something about Wonder Woman on Pinterest, and sifted through a bin of baby clothes a friend of mine had given to us.  After finding something that would work, it only took a few sewed lines, and some felt to turn my baby into a superhero.  I am in love with the final result and had a lot of fun putting it together.  She was pretty much a hit at our church Halloween party.  :)


Wonder Norah!

I realize that today is Halloween, and these "ideas" don't really help you now.  But I figured tutu's and costumes are fun to play in all year round.  I hope you all have a safe and fun Halloween!


Allison

Friday, October 26, 2012

Sara Jane: Berry Crisp

For the past two weeks, I have had the opportunity to serve a sweet friend of mine, who has been in need of a little extra TLC, by taking her dinner.  My sweet friend is gluten intolerant so I have challenged myself to find delicious recipes that are within her strict dietary guidelines.  I have had so much fun doing this.  You would think that cooking for 6 extra people would be difficult but it really has been so easy and quite relaxing.  I don't know how else to describe it.  I have LOVED every minute of it and have found some pretty yummy alternatives to foods we eat all the time.  I will be compiling the recipes I have made along with some other delicious finds in a blog for my friend.  I am sure she won't mind me sharing the blog with you when it is finished.

With each yummy meal, I have tried to make a dessert that goes along with it.  I usually alternate between a fresh fruit dessert and a gooey chocolate dessert.  Yesterday, I made a creation that I know isn't new to anyone but it was so tasty last night at 10:00 PM that I have to share it with you.


Berry Crisp

I call this "Berry Crisp" because you could use any berry in it and it would still be delicious.  We happen to have raspberries so that is what I used.  I would just make sure to adjust the amount of sugar you use if you use a less tart berry, like a blackberries or blueberries. 

The only way this crisp is really different from other crisps I have made is that I didn't use flour in the topping.  Last week, I made my friend an apple crisp and used quinoa flour in the topping.  I didn't like the after taste that the quinoa left so I omitted that this week and actually enjoyed it better than my usual crisp topping.  

Ingredients:

4 cups berries (I used frozen berries from this summer; fresh would be delicious, too)
1/4 to 1/2 cup sugar (depending on how sweet you want your berries)
2 Tablespoon cornstarch 
1/2 cup melted butter
2 cups rolled oats
1 cup brown sugar

Directions:

Preheat your oven to 375*.

Toss your berries with the cornstarch and sugar, coating the berries. Set aside.

To make the "crisp" topping, combined your oats and brown sugar.  Pour your butter over the oats/brown sugar and mix together.  It should be very clumpy.  If it isn't, add more oats until it is.

To assemble the dessert, I filled small jars 1/2 way full of the berry mixture and then topped them with the crisp mixture.  When you have both in there, you should have your jar about 3/4 full.  Leave some room so when the berries start bubbling they don't over flow.

I put the full jars onto a pan (to catch any runaway berry juice) and cooked them for about a half hour or until the topping was nicely browned.

Since I was taking these to my friend and not eating them right away, I let the jars cool for about 10 minutes and then capped the them with a lid and a band.

* I find that when I make berry crisp with just sugar, the juices are too runny.  The cornstarch thickens the berry juices giving it more of a sauce feel.  If you don't care for that consistency, omit the cornstarch and just use the sugar.  

*If you feel like you need more or less of the oats, sugar and/or butter for the topping, then adjust to what YOU like.  We like a lot of oats in our topping so I tend to put a bit extra in.

*Since I knew a jar portion would be too little for my hubby, I cooked his crisp in an cereal bowl that was oven safe and it was the perfect portion for him. 

I really am so grateful for the opportunity to serve and hope that I can always serve with a happy heart, even if it doesn't involve food :)

Loves

Sara Jane

Tuesday, October 23, 2012

Allison: Halloween Treats

Hello again! Isn't my sister, Lisa, such a fun mom? I love reading about their fun family traditions. I can't wait for my little ones to be old enough to participate in and start some new family traditions.

This week, I thought I'd share one of my favorite treats to make almost any holiday of the year. I don't have a name for them so we'll call them holiday pretzels. I know I've seen these on Pinterest lately, but I've been making them for almost 10 years now, thanks to the Kitchen family. I lived with three sisters in college and spent a Thanksgiving with this amazing family, where we made these fun treats. I've been making them ever since (with a few changes).

Here's how you make them:

Step 1- Pre-heat the oven to 350 degrees.

Step 2- Unwrap A LOT of Hershey Kisses.


Step 3- Spread mini pretzels on a baking sheet and place 1 unwrapped kiss on top of each pretzel.

Step 4- Place the cookie sheet in the oven for about 2 1/2 minutes.

Step 5- Pull the tray out of the oven, and press one M&M down on each kiss.

Step 6- Allow pretzels to cool (or sneak a few while they're still gooey.  Yum!).

The finished product and my "helper".

See how easy that was? I also love this treat because little ones can help with the first part. I usually don't let them push the M&Ms down as the pan and chocolate can get pretty hot. I can't wait for my little ones to be able to join me in making these! For now, my two-year-old is way more interested in eating the supplies.

After having made these for years, I've found a few tricks or ideas to share:

- With all the different kinds of Hershey Kisses, you can definitely use more than just plain chocolate. The melting time may be reduced or extended. I usually open the oven and test pushing a M&M down in one of the kisses. If it doesn't go down easily, it's not melted enough.

- An even easier way to change the flavor is to switch out different M&M flavors. I've used peanut, almond, mint and any other fun flavor available. The holiday pack colors also make then more festive.

- Be careful not to let the chocolate melt for too long in the oven. The chocolate can over cook, causing the tip to harden and add a degree of difficulty to your project. I always set a timer since I've forgotten a batch in the oven more than once.

- Once the chocolate is ready, push the M&Ms down as quickly as possible. As the chocolate cools, this gets harder to do.

- Sticking the tray into the fridge or freezer will speed the cooling process (obviously). They also store really well in either the fridge or freezer in a Ziploc bag.

These are the perfect treat to gift or have at a Halloween (or any holiday) party.  But watch out... they're addictive!!  :)  Hope you all enjoy this treat and have a great week!

P.S.  You might see some day changes for the next few weeks.  For a little while, we'll now be posting just Mondays, Wednesdays and Fridays (I still went a day early... oops!).


Allison


Monday, October 22, 2012

Lisa: Eyeball Pie and Some Ghostly Friends!!

Hello!!  I am very excited about this time of year!  I love the fall and the beginning of the Holiday Season.  The cool weather, nice storms and the excitment for our traditions just makes it so enjoyable! 

I have a few traditions that my kids, my husband and I have formed over the years.  I tend to be the room mother of one of their classes so we have Halloween Parties at school that I am incharge of.  I try to have four stations that the kids rotate through: a craft, a food, and two game stations.  One of the crafts that we do that is very easy and popular (because it invovles candy!) is:

Tissue Paper Ghosts

These are super easy, especially for the younger children.  I think my sisters will remember these because we use to make them growing up!  They are simple but so fun for the kids to make and decorate the house with! 

Supplies:
Kleenex Tissues
Lollipops
Ribbon/Yarn
Sharpie/Marker

Directions:
Cover a lollipop with a tissue.  Tie around the top of the stick to keep the tissue in place.  Draw a face onto the tissue.  Easy.  You probably didn't even need instructions!
 
Another tradition that we do during the month of October is Halloween food.  We love to come up with scary/gross food to eat.  But not too scary or gross!!  I thought I'd share with you one of those recipes.  This one is called:

Eyeball Pie   


Ingredients:
1 medium potato, shredded and drained (or just squeeze out the juice)
4 strips of bacon, cooked and crumbled
1/4 c. cheddar cheese, shredded
1/4 c. butter, melted
salt and pepper to taste
4-8 eggs

Directions:
Take 4 mini pie tins and divide the shredded potato between them.   Press the potato up the sides and bottom of the tin.  Drizzle 1-2 teaspoons of butter over potatoes in each pie tin.  Sprinkle with salt and pepper.  Bake in 425 degree oven for 15-20 minutes, until potatoes begin to crisp.  Then, into the hashbrown crust, sprinkle bacon and cheese.  Over the top of the pie, add a cracked egg or two.  Salt and pepper the egg, to taste.  Finally, drizzle the remaining butter over the top of the eggs and put back into a 350 degree oven for 10-15 minutes.  It is really a nice breakfast treat.  My picky child even declared she wanted this every morning (but to be honest, she'd say that about anything with bacon!).

And finally, what is Halloween without decorations?  I love Halloween decor but not the scary stuff.  I prefer the cute!  One of the things I got last year were these

 Mummy Blocks


These are so cute and easy to make but they are one of my kids' favorite decorations!
 
Supplies:
Wood of any size
White craft paint
White fabric, torn into 1" wide strips
Googley eyes
Black craft paint
Sponge brush
Glue gun
 
Directions:
Take you wood pieces and paint white.  When paint is dry, wrap blocks with fabric, making sure to put a little bit of glue under the fabric each time your wrap it around the side of the block.  Next take your black paint and just dry brush the edges of the block and bandages, in the manner you see above.  Finally, glue on your googley eyes and there you go.  Simple and awesome!
 
Well, there are a few of our traditions for this time of year!  Hope you enjoy!
 
 
Lisa


Sunday, October 21, 2012

Sara Jane: Pumpkin Bag Giveaway Winner...

Hey everyone.  Thank you for all your comments.  I love your holiday traditions you shared.

Alright, we have a winner for the giveaway...

Rebecca Wray!

Her holiday tradition was:

"My dad used to make a big pot of chili on Halloween night.  We would take a break from trick-or-treating and eat a bowl with some corn bread.  I love those memories and hope to do the same when my kids get older."

What a fun dad!

Rebecca, send your mailing address to fivecraftysisters.blogspot.com and I will get you the bags ASAP.

Thanks again, everyone!

Tuesday, October 16, 2012

Sara Jane: Felt Pumpkin Bags

***Giveaway is now closed***

Have I told you how amazing my/our mother is?  Well, she is.  She always has been, too.  She was the mom who was always volunteering in the classroom.  She would give demonstrations at school on how to make bread or sew an apron.  She made (back when you could take homemade treats) birthday treats for the class when our birthdays came around (keep in mind she had 7 children).  She was very involved in PTA (her fundraisers funded the new playground when I was in elementary school).  She was/is amazing!

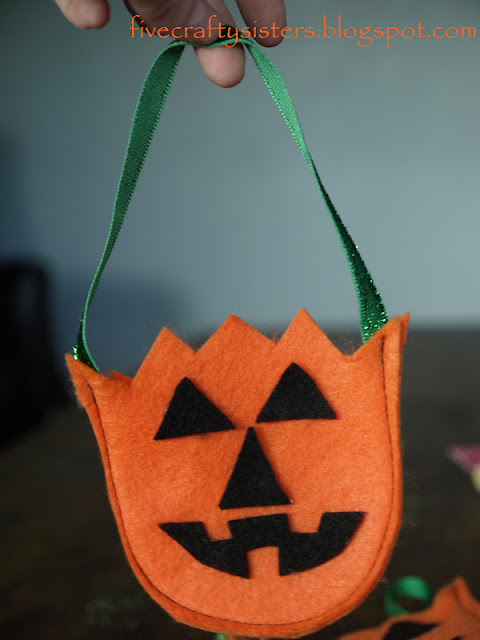
One of the fun things I remember her doing for at least a few of my school classes were pumpkin bags for Halloween.  She would spend hours cutting and sewing the bags and then stuff the cute bags with little treats and plastic spiders.  

A few years ago, I came across one of my pumpkin bags from my childhood.  At this time, Penelope was just beginning to understand how fun Halloween and other holidays were.  I made a pattern off of the bag, made 10 bags, and then Penelope and I took them to her favorite people (I think one actually made it back to my mom).  We had so much fun doing it that it has now become a tradition in my family and I hope to someday get to take a tray of them to my children's classes.

With special permission from my mother, I am going to share these bags with you.  Here we go...


First, you will need black and orange felt and ribbon for the handle.  My mom always used green ribbon so that is what I have used. First, cut out a pumpkin, a mouth, a nose and two eyes.  For the nose and eyes, I just cut random triangles so each pumpkin was different.  If you would like a copy of the template I used for the pumpkin and the mouth, either leave your email in a comment or email me at fivecraftysisters@gmail.com and I would be happy to send one to you.  I could not get the template uploaded.  Next, using your hot glue gun, glue on the eyes, nose and mouth making sure to leave enough room for a seam.


Next, you sew the pumpkin together, making a bag.  A few things to remember: (1) be sure to add the ribbon into the first few stitches, (2) make sure to back stitch the beginning and end and (3) make sure to keep the top open - You may be thinking "duh"...I've sewed the top shut before :)

I had quite a difficult time sewing these little guys this time around.  My thread kept breaking, my needle broke....needless to say, these bags are in no way perfect but I am sure the children who receive them will still love them.  I tried hot gluing the pumpkin pieces together and it worked really well.  I just like the look of the black thread on the orange felt :)


When you are finished sewing, this is what your bag should look like.


We like to fill ours with our favorite candy and I always add, just like my mom did, a plastic spider ring.  This year, we are also adding Dracula teeth.  


Penelope can't wait to hand out her favorite little goody bags.  


Now for the giveaway that I promised back here...

I will be giving away TEN pumpkin bags to one lucky reader (treats not included). 

All you have to do to be in the running to receive these is leave a comment on what your favorite holiday tradition is in your family.  This giveaway will close at 12:00 AM on Saturday morning.  That way I can mail the bags to you in time for Halloween.


 I hope you guys enjoy these bags as much as we do around here.

Sara Jane

Allison: Halloween Decorations

Hello again! I wanted to start my post by announcing the winner of the Halloween wreath giveaway from last week. And the winner is... (Drumroll, please)... Bethany!! To my question, "What is your favorite Fall craft or treat?" she responded:

"How about my favorite fall activity? I love going to the pumpkin patch! We always have so much fun. I love fall in the NW. Crisp, sunny days, the smell in the air, the leaves changing....it's the best!"

She made me particularly homesick for Oregon with that comment, but I won't hold it against her... too much. Congrats, Bethany! And a big thanks to everyone else who left a comment. We love hearing from all of you!

For this week's post, I'm being a little lazy. I'm going to share some ideas that I'm GOING to do, but haven't yet. But they were all so creative, that I wanted to share.


I love this first Halloween craft, because it's something that kids could help with. I think these little bats would be fun strung from trees in the front yard (or the cactus, in my case).  Here's where I found this idea.


I thought this next idea was really fun.  Using toilet paper or paper towel rolls, cut some "eyes" and insert a glow stick.  Then place them in bushes to shine like scary eyes in the night.  I've never seen this idea before, and with a 2 pack of glow sticks in the dollar section at Target, it's easy to accomplish. I found the idea here.


I kind of hate the water here in Arizona, which results in a lot of empty water gallon jugs in our recycling. So this next idea was a no-brainer. Those same dollar glow sticks would work great to line our front walkway Halloween night. I can't wait to see the end product! I found this idea here.


Last but not least, Pinterest helped me find this fun idea.  All you have to do is glue a magnet to the back of a plastic spider and stick them wherever you want.   Creeps me out just looking at it!  I only wish my door was made of metal.  I'm sure I can find somewhere to put them. Here's the original site for this idea.

So there you go! I'll try to take pictures of the final products Halloween night. What fun decorations do you have planned? I hope you all have a great week!!


Allison

Lisa: A Quick Post


Hello, there!  I thought I'd sneak a quick post in before Allison gets her's posted.  I have been a slacker.  We've had some situations arise (some expected and others not expected) that I needed to give my full attention to!  But, hopefully, those situations are now under control and I'm ready to begin again.  I'm sad I've missed so many great opportunities to post because fall is my favorite time of year, just as it seems to be all of my sisters!!  Well, I'll be posting some of our favorite traditions, crafts and food coming up in the next few weeks.  Hopefully that will make up for my missed posts!  Have a wonderful week!


Lisa

Wednesday, October 10, 2012

Allison: Halloween Wreath and Giveaway

                                     ****************GIVEAWAY IS CLOSED*******************

Hello and welcome to another week!! It has been a busy one for my sisters and me. With travel and family obligations, sometimes posts don't happen. On that note, mine is a day late. But I actually have a craft to post!

I was walking up to my front door the other day and saw the wreath I made for this post. Now that it's October and almost Halloween, I figured it was time to switch it out.


I'm not going to repost the steps, since they're pretty much the same. But instead of patriotic colors, I bought some cute new fabric and raided my scraps to find all I needed to make this cute wreath. I love the freedom you have with scrappy wreaths to make it as crazy or "clean" as you want. I may end up adding a "boo" or something to make it more exciting. Then again, I might just leave it plain too. :)

I ended up having so many extra strips that I thought I'd do a giveaway this week. To be entered to win this Halloween wreath, you just need to answer the question below:


What's your favorite Fall craft or treat?


A view of the other side of the wreath.


The Giveaway will close Monday night, and I'll announce the winner in my post the next morning.  I am seriously missing the NW and their beautiful Autumn trees and weather. Help me feel even more homesick by reminding me what I'm missing. :) Have a great week!!

Allison

Sara Jane: Pumpkin Chocolate Salt Cake

Its been another one of those weeks...

Instead of creating the cute little pumpkin favors I was going to make (all of the materials are sitting on my table as we speak), I, instead, am sharing with you a cake I am determined to make this fall season.

Doesn't it look heavenly...

From the blog of Use Real Butter
You can find the recipe for this beautiful Pumpkin Chocolate Salt Cake here.  If you try it, send us a picture of your creation.

Sara Jane


Thursday, October 4, 2012

Shauna: 13 Days of Halloween


For my son, this is the first year he has really gotten excited about Halloween and it is honestly getting me more excited too (I didn't know it was possible).  Every time we go out and he sees a pumpkin or a wreath he gets so happy and yells, 'look Mom Halloween!!!'.  So I decided our yearly tradition of just randomly engaging in fall activities wont cut it this year.  This year we need a plan.  And thus, the 13 days of Halloween was born.


Last year I had an etsy shop selling earings and I had bought LOTS of little craft jewelry boxes and now subsequensly have dozens lying in storage, just calling to be used.  So I decided this would be a perfect craft to use them, making a little advent calender, counting down the days to Halloween with fun toddler friendly activities.


First I painted the boxes, half Orange, half splattered Orange.  Then I wrote the numbers on the lid, glued a magnet on the back, and added fun family Halloween activities with little prizes for the boys to open every morning and enjoy. 


I tried to think of things to do that didn't include spending money, but a couple of the activities cost money, but I figured they were things we would do anyway. 

13 days of Halloween: Activities

1. Mail spooky card to grandparents

2. Attend a Halloween party

3. Make Halloween sugar cookies

4. Have a Halloween party

5. Drink hot apple cider

6. Carve pumpkins

7. Go to a pumpkin patch

8. Have a spooky dinner

9. Make our Halloween costumes

10. Watch a fun Halloween movie

11. Rent Halloween books from the library

12. Go on a fall drive to look at leaves

13. Go Trick or Treating

Tuesday, October 2, 2012

Allison: Pumpkin Spice Cookies

Hello, again!  First off, I would also like to send my condolences to Lisa's extended family for the lost of their brother-in-law, son-in-law and father.  I remember Greg from various encounters years ago, and he was a great man.  Any contributions that could be made to support this amazing family, would be incredibly appreciated (see Sara's last post).

I'm not sure where time is going, but another week is here, and I'm still not 100% back to my crafting and baking self.  So for this week, I thought I'd share one of my favorite Fall recipes: Pumpkin Spice Cookies.  They have been a go-to treat each Autumn since I first tasted them in Sara's kitchen.  (Sorry, Sara, if I'm stealing a post idea.  At least I'm giving you credit!)  This yummy treat is incredibly easy and amazingly delicious.  Here's how you make them:

1- box of spice cake mix
1- 15 oz can of pureed pumpkin
chocolate chips (optional, but essential at the same time)

That's it!  You combine all ingredients, spoon onto a baking sheet and bake at 350 degrees for 10-12 minutes (until they're set).  Can you think of an easier treat?  They're so moist and delicious and always a crowd pleaser.  I was going to make some, but let's face it... getting to the store is still a little tricky.  But I'll definitely be making them this season, and I'll try to post some then.  Sorry for the lame post!  I'll get back into the swing of things soon.  Promise.  What's your favorite Fall treat??

Have a great week!!


Allison