Wednesday, August 8, 2012

Sara Jane: A Bavarian Feast and Outdoor Waterbed

I will apologize in advance.  This is going to be a LONG post.  We have had a really fun week and I wanted to share all of it with you.

First up...the food (of course!).

For this week's Olympic meal, I made German food.  Normally, we wouldn't eat this type of a meal in the summer (we're mostly veggies around here) but we HAD to for the Olympics, right?

For our Bavarian feast, we had sausage, latkes, fondue and pretzels.  This is another rather time consuming meal but if you're up for it, I would recommend it all the way.  It was absolutely delicious!  


Here we go....


LATKES 
(Potato Pancakes)

Ingredients:

2 large potatoes, peeled and shredded (I use regular baker potatoes.  After I shred the potato, I set them aside in a bowl of cold water to prevent them from changing color.)
1 medium onion, diced
1 egg
2 Tablespoon flour
1 teaspoon baking powder
1 Tablespoon vegetable oil, plus 1/2 to 1 cup more for cooking

Directions:

Combined oil, onion, egg, flour, baking powder, a pinch of salt, and about 1/8 teaspoon pepper in a large bowl.  Add drained shredded potatoes until combined.

In a skillet, add enough oil to be about 1/8 inch thick on the bottom.  When the oil is hot, using a 1/4 cup measuring cup, drop cup fulls into the oil.  I usually only cook 2 or 3 at a time as to not overcrowd my skillet and lower the oil temperature.

Cook the latkes until they are a deep golden brown (about 2 to 3 minutes per side).  When they are done, remove them from the oil and drain on a paper towel.  Sprinkle with salt.

If you are not going to eat them right away, keep them warm in a 200* oven.

Traditionally, these are served with apple sauce.  I prefer mine by themselves.


These pretzels are delicious.  I searched and searched for a good recipe for pretzels and found one several months ago.  It is mostly the recipe I am about to give you but I can't remember where I found it.  I changed a couple of the amounts of ingredients.  It is a very basic recipe that I have never had turn out badly.  Try it.  You won't go back to your old method...I promise!

HOMEMADE PRETZELS

Ingredients:

1 1/2 cups warm water
1 Tablespoon of yeast
1/3 cup brown sugar
4 to 4 1/2 cups of white flour
1/2 cup baking soda

Directions:

Preheat oven to 475*.

In a large bowl, combined the water, yeast and sugar.  Let proof for 3 to 5 minutes, or until frothy.  Add flour, one cup at a time.  If, after you have added the 4 cups of flour, the dough seems too sticky, add another 1/2 cup.  Knead dough for a few minutes until nice and smooth.  You can let the dough sit or use it right away.  

In a large pot, boil 4 cups of water (or about half a pot full) and 1/2 cups baking soda.  Add the soda to the water BEFORE you turn on the burner.  If you add the soda to the water after the water is boiling, you will have a huge mess.  Trust me :)

When you are ready to begin, cut off small (about golf ball size) pieces of dough.  Shape them how you like (sometimes we just do pretzel sticks, especially if we are dipping them into cheese) and drop them into the boiling water/soda.  Boil them for about 30 seconds.  Most of the time they will float to the top when they are ready.  Again, do not put too many in the pot at once.  A few at a time.  Once they are done boiling, place them on a greased cookie sheet.

When your sheet is full, cook them in your preheated oven for 8 to 9 minutes, until golden brown.  When they come out of the oven, you can brush them with butter (or not) and sprinkle salt (or cinnamon sugar) on them.

My kids love pretzel dogs.  If you want to give those a try, simply wrap a regular hot dog in a rope of dough, boil for 30 seconds and cook for 8 to 9 minutes.


Sorry folks.  I don't make my own sausage.  I wish I did but...I don't.  We buy our favorite sausage at our local grocery store and cook it until it is ready.  Its that simple.  

As for my fondue recipe, I simply used the cheese from my mac and cheese I made here.  

Just in case you were wondering what was going on while I was making this delicious dinner....


Bea found some water AND dirt! Lovely!

Next up...I've seen the outdoor waterbeds all over Pinterest lately so I thought I would give it a try, too.

Here's what I used for my waterbed.  Gorilla tape (next to the duct tape at the store), 2 heavy duty shower curtains and a pair of scissors.


If you have an old water toy that has one of these nifty hose hook ups, cut it out and use it on your waterbed.  It made filling it SO much easier!


To start, I laid my shower curtains out flat on my family room floor, one on top of the other, and then I started taping. It took about 30 minutes to tape the entire thing together.  After taping each side, I would then tape the inside too to prevent too much leaking.  When I got to the fourth side, I cut a small hole out for my hose hook up, placed the piece in the hole and taped all around the hook up.  Then I finished taping the fourth side.  Before I began filling the bed, I went back over my tape job to make sure I didn't miss anything.  Then I started filling.

After a good 20 minutes of filling, the bed was finally ready for the kiddos to play on.  


At first, the kids just enjoyed laying on the bed.  I purposely put the waterbed in the shade so it would stay cool.  It was perfect.


 Then a leak sprang.  No worries, Bea was there to catch all the water.


 After a few hours, we did need to refill the bed but it was totally worth it.  If you have the time, I would definitely recommend making your kids one of these before the summer ends.  It provided hours of fun for my babies.


Sara Jane

Tuesday, August 7, 2012

Allison: Go-To Cookies


Hello again! This week I'm feeling particularly pregnant and decided it was a good week to share my go-to cookies: Thumbprints.  I found this recipe a few years ago, and really love how easy it is, but how complicated it seems.  Does that make sense?  I can bust out a batch in no time at all, but they look more high-maintenance than they are.  Here's the recipe that I pretty much copied exactly from allrecipe.com:

Ingredients

1 cup butter, softened (I use 3/4 cup butter or 1 1/2 sticks)
2 1/2 cups all-purpose flour
1/2 cup white sugar
1/2 cup packed brown sugar
1 egg
1 tsp baking powder
1 tsp vanilla extract
1/4 cup raspberry preserves (or any jam/filling you like)
1/3 cup confectioner's sugar for decoration (I omit this ingredient)


  • Directions
  1. Preheat oven to 350 degrees F (175 degrees C). Grease baking sheets.
  2. Cream the butter with the white sugar and brown sugar. Beat in the egg and vanilla.
  3. Mix the flour and baking powder together. Stir in the flour mixture into the butter mixture and combine.
  4. Form dough into 1 inch balls and place on the prepared baking sheet. Make an indentation in each cookie and fill with jam (I use a teaspoon measuring spoon to make the indentation.  Dipping it in sugar will help it not stick to the cookies). Bake at 350 degrees F (175 degrees C) for 12 to 15 minutes (13 minutes is my magic number.  I leave them on the cookie sheet for a few more minutes to "set").  Let cool completely and sprinkle with confectioners' sugar (or not.  They're amazing without the sugar).

*Makes about 32 cookies (though the recipe says only 18.  I must make mine smaller).


* I almost completely fill "the well" with jam/filling, as the cookie will spread and so will the jam.  The pie filling didn't seem to spread at all, so I took that into consideration with the second batch.


There you have it!  These cookies are so buttery delicious, that I'm sure this recipe will become one of your favorites too.  Have a great week!!


Allison


Monday, August 6, 2012

Lisa: Cleaning Tips Revealed!!

Good Monday morning to you all!!  I hope you had a fabulous weekend!  We had a superb one with a baptism of our nephew, date night with my hubby and me and a wonderful get together at our house with my in-laws.  It was great! 

Well, I have the results of my cleaning tips that I am ready to share with you!  Some were really worth the effort and others are no different that putting a little elbow grease into it.  So without further delay, I give you the results!

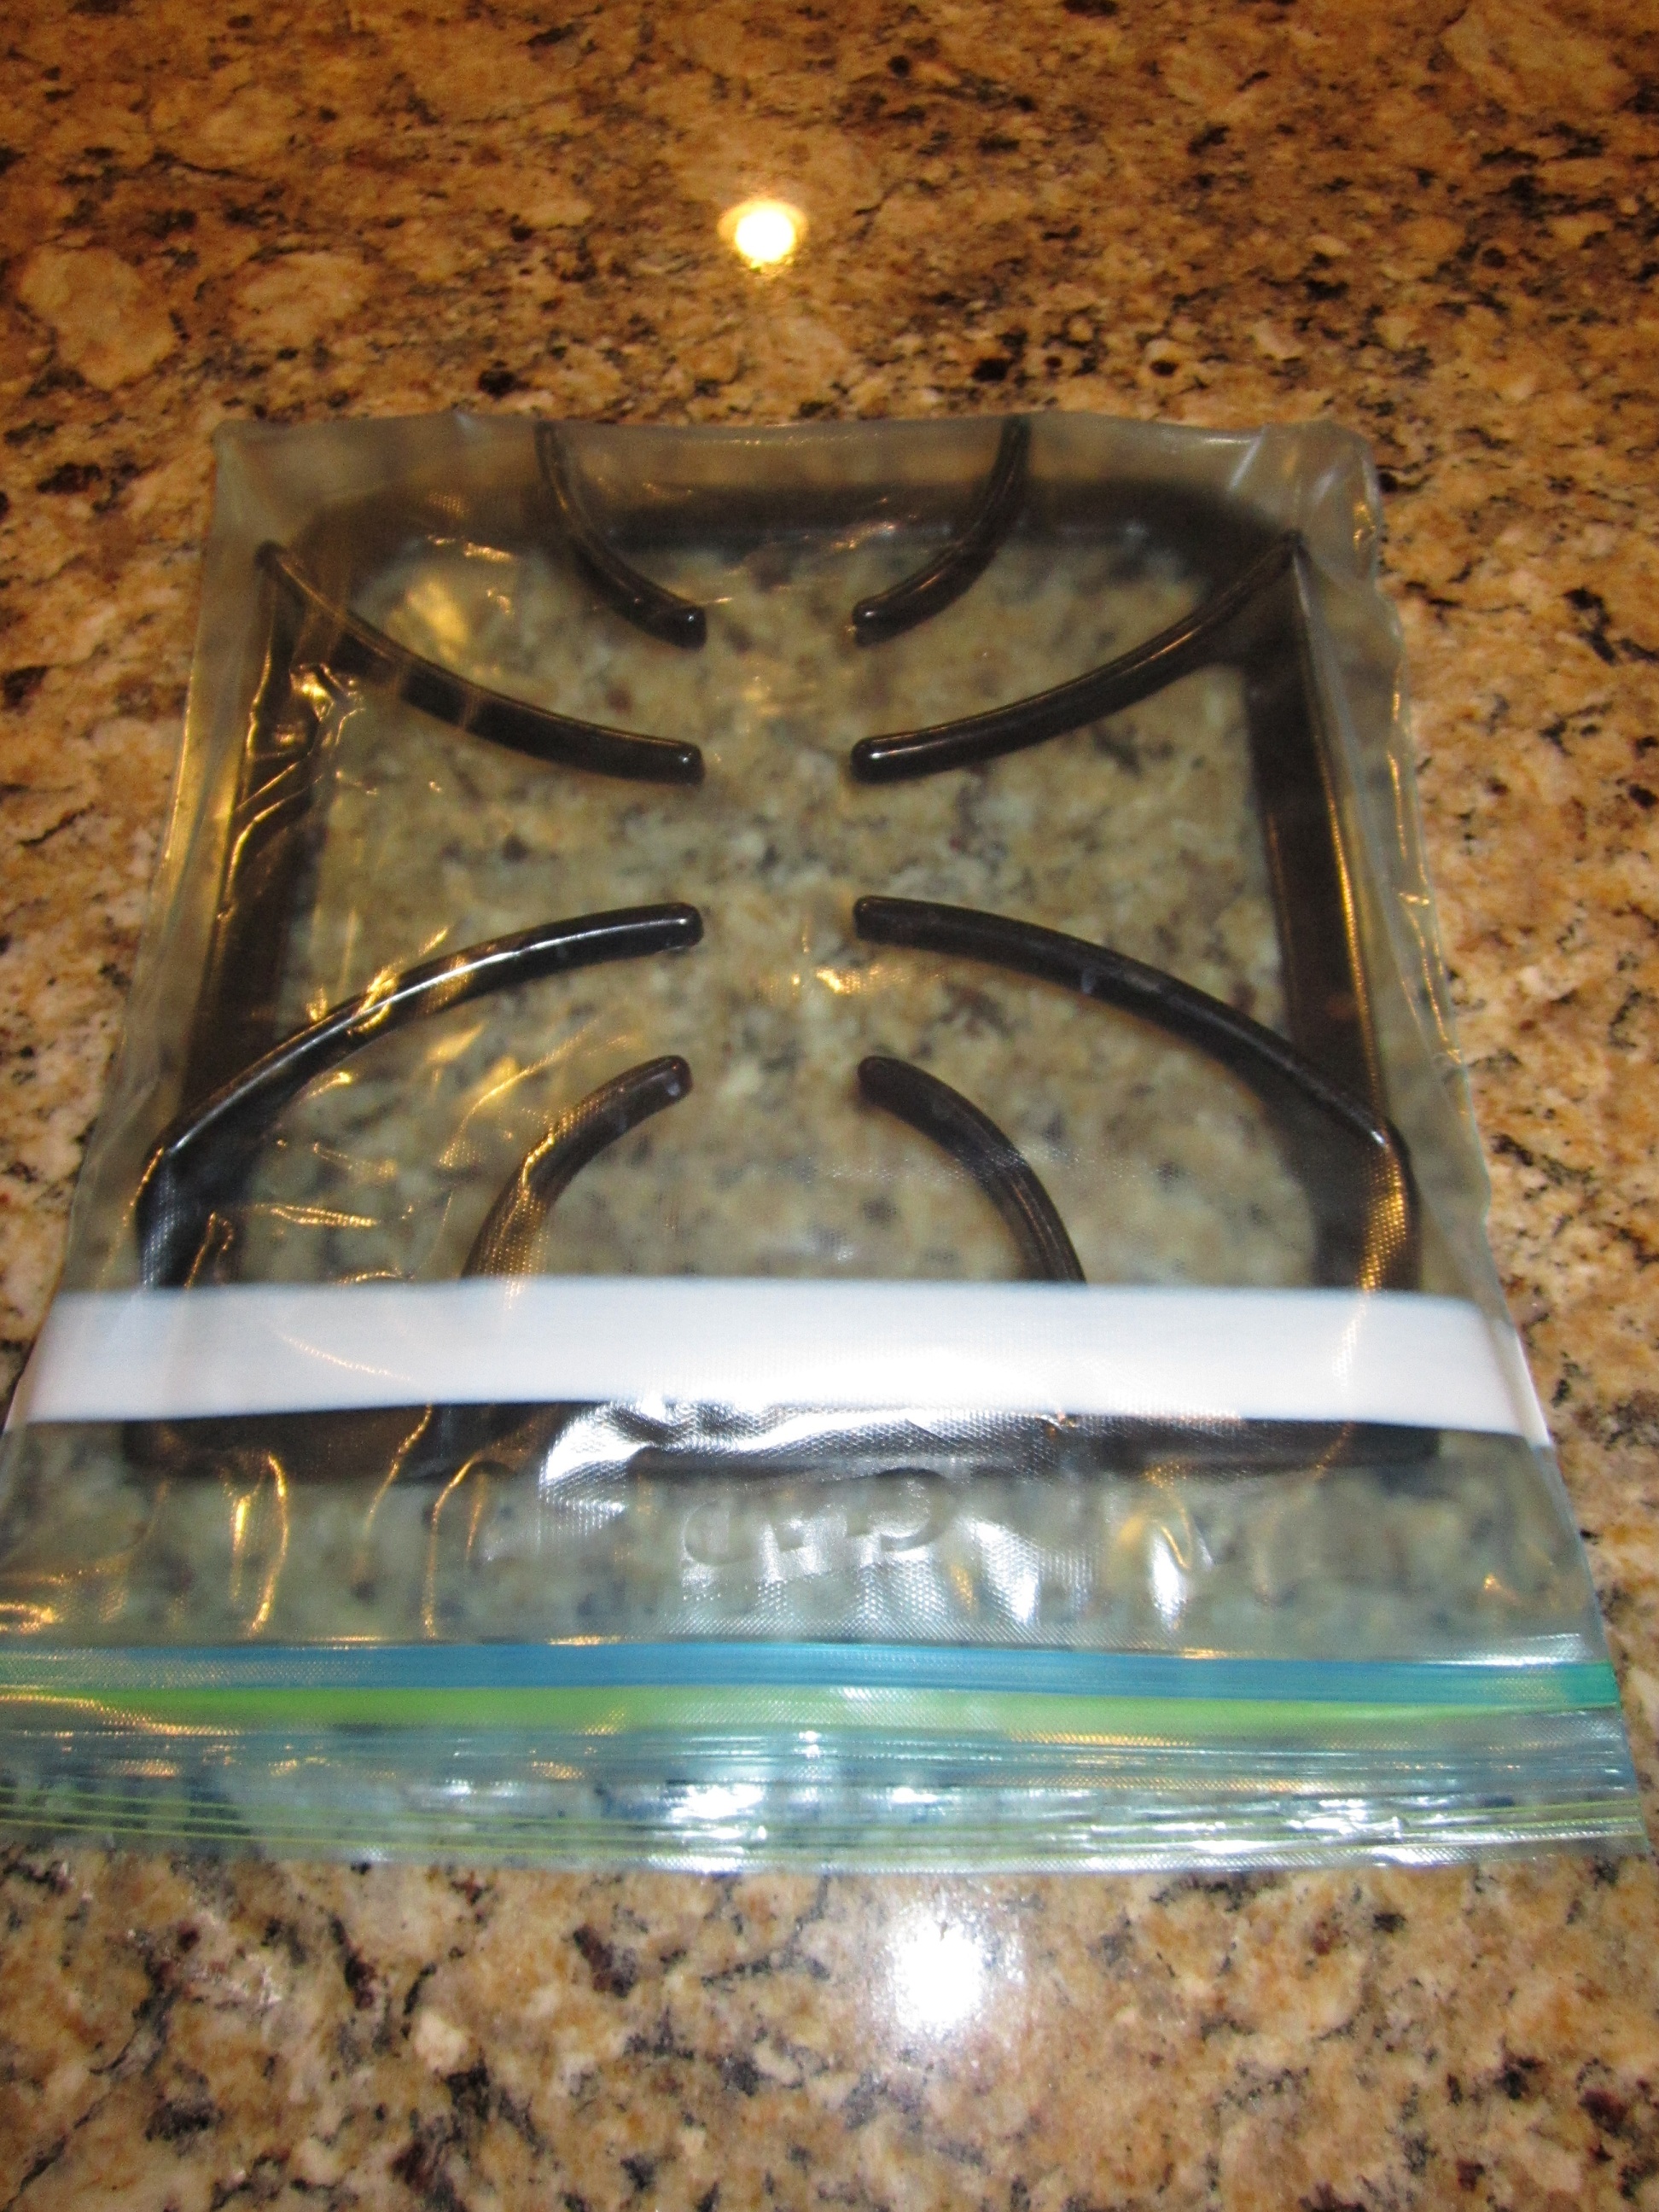
1) Cleaning the grate from a gas stove top with ammonia.


Results: Definitely worth it!!  I wasn't thinking but my grates are twice as big as this one pictured so I put all three of them in a large garbage bag and poured the ammonia in.  I twist tied the end and made sure there were no leaks.  I left and was ready to let them sit overnight.  Well, my husband went downstairs and discovered after three hours that, of course, the ammonia had leaked through the bag.  We pulled the grates out and discovered that the parts of the ammonia that had gotten a good soak were super easy to clean.


 We just had to basically wipe off the crude instead of scrubbing forever to get a bit off.  The parts of the grate that didn't sit in the ammonia were really messy,still, and hard to clean.


 I think next time, I'll put them in a tote tray and pour the ammonia in and cover them over night.  But over all, I am really pleased to have so easy a solution for such a hard problem!!

2) Soak your knives in lemon juice to get rid of rust spots


Results:  It kind of worked.  It did make it slightly easier to remove the rust stains but it still required a lot of scrubbing.  I guess any help is good, though, right?!  Here are my before and after knife pictures.


Well, I guess this cleaning tip got me to clean my knives, so....success??

3) Using a Mr. Clean Magic Eraser to clean off my cookie sheet.

Results: Failed!!  It did not help and using a green scrubby seemed a whole lot more successful at getting the pan clean than the Magic Eraser.  I had high hope for you, Mr. Power!!  I also heard that if you put some in your toilet bowl, it would clean it over night.  It didn't.  But, as always, the Magic Eraser worked wonders on cleaning off the walls and moldings in my house.  It even got rid of the black scuff mark on my garage door where someone karate chopped the door close.  Nicely done, my Ninjas! Nicely done!

Well, that's it for me!!  Hopefully this helped anyone who wanted to know!  See you next week!
Lisa


Friday, August 3, 2012

Friday Favorites: Cleaning Tips/Tricks


Welcome to another Friday!  Today's topic kind of shows the lack of motivation I've felt this week.  At the same time, it's a little ironic, because I'm not a cleaner.  I am an organizer, but NOT a cleaner.  I'm pretty good at keeping things surface clean, but deep cleaning is not something that I've ever been good at.  Just ask my husband or past roommates.

This is a pic from the link... I wish mine looked this nice,
and this is her before picture!
But this week, I'm going to share a tip that I'd heard about from others, but didn't actually try until I was so fed up with the problem that I finally did something about it.  That's usually how I roll.

We have a flat-top stove.  I hate it.  Our last place had one too, but at least that stove top was black.  You could see the burnt-on food stains, but you could pretend they weren't not there for a little while.  Our current stove top is white.  WHITE!!  Who would do that?  Every single drop of food shows up and I hate it.  I can't wait to have a gas range or even those ugly spiral burners.  Anything would be better.

Having never experiences a flat-top stove before, I took our previous landlord's advice and used the scrub he left for us.  It worked good enough, but took some elbow grease and usually resulted in some sore arms the next day (sad, I know).  In our current house, I found some cleaner at Wal Mart that has more or less got the job done, but takes SO MUCH WORK, that I usually let it go until the entire surface of each burner is disgusting and embarrassing.  Then I found a pin on Pinterest that saved me.  Here is the website it linked to.  The basic idea is to sprinkler baking soda on the stove top, cover with a warm cleaning rag, and let it sit for 15 minutes.  It creates this kind of paste, and then you scrub it around the stained areas.  THAT'S IT!!  Seriously?  I felt kind of dumb after seeing how much easier it was.  Most of the stains come off pretty easily.  Some still took some scrubbing, but eventually came out too.

I'm so glad I found this tip/trick!  It's probably not new to anyone else, but there has to be at least one person out there who has the same problem, and is as clueless as I was.  :)  Hope this helped!  Have a great weekend!!

Allison
----------------------------------------------------------------------------------------------------------------------
Nice, Allie!  I'm going to have to try that on my gas cooktop.  It always looks a little less than sparkling clean! 

Well, for my turn on this post I thought I'd share with you a couple of cleaning tips that I had heard about but haven't tried yet.  I'll try them this weekend and give you the results on Monday with my weekly post.  They are tips I've seen on Pinterest (love that place!) but seem too good to be true!  First let me say, I really don't like to clean!  I love a clean house but always seem to have a hard time maintaining the level of clean I'd like.  Maybe it is because my beautiful babies/teenagers haven't mastered the idea that they should clean up after themselves!!  So, anytime I can find a shortcut to hours of scrubbing, I'll take it!!

1) How to clean the grates on your gas stove.


This one appears relatively easy.  Just put the grate into a gallon sized zip bag and put a little ammonia in with it.  Let it soak 12 hours and rinse.  Easy.  Hopefully it works because I hate scrubbing those things!!

2)How to remove rust spots from your knives.


Just put the knives in with some lemon juice, let them soak, do a quick scrub with a green scrubby pad and done.  I hope it is this easy!

3) How to clean your stained cookie sheets.

I don't have a picture for this one but they recommend scrubbing with a Mr. Clean Magic Eraser.  I do love how amazing those erasers are!!

So, there you are.  I'll let you know the results!!  Hopefully it is magically cleaned!!  Have a great weekend!
Lisa

Wednesday, August 1, 2012

Sara Jane: Fish and Chips

At our house, we are very excited that the Olympics are FINALLY here.  We all stayed up to watch the Opening Ceremony and ever since, the Olympics are always on.

To celebrate the Olympics, each week we are going to make a dish representative of a country in the Olympics.  First week....England (Great Britain), of course!


This week we made Fish and Chips.  This is kind of a big deal for me because I really don't like fish.  Everyone says, "Oh, but you will love the way I cook it."  AND....I never do.  I just don't like it but everyone else in my family does so...here we go.

For our Fish & Chips dinner, I also wanted to add onion rings to the mix because, well, I could eat my onion rings all day.  Because onion rings are delicious fresh out of the oil or after they have been sitting for a few minutes, I made them up first.  The recipe I used is actually my dad's recipe.  I have eaten these onion rings since I was a child and they ALWAYS turn out.  For tonight's onion rings, I used Walla Walla Sweet onions (Have you ever used Walla Walla's?  They are fabulous!).  Also, my dad uses Saltine Crackers but we never have those around here so I used Ritz Crackers and I really liked the buttery flavor they added.  With permission from my dad, here is the recipe as was told to me by my dad for our family cookbook...


Ingredients:

Vegetable oil, for deep frying
2 large onions sliced approximately 1/2 inch wide.  Punch out the holes leaving individual rings.
1 to 2 cups flour
2 cups milk
Worchestershire sauce (Optional)
2 eggs
1 sleeve of Saltine (or Ritz) Crackers, crushed
Salt
Pepper

Directions:

Dip rings in a milk bath and then in flour.  Allow them to dry.  (I dry mine on a cooling rack).

When rings are dry, add eggs, Worcestershire sauce (I never use this), salt and anything else you want to try to the milk bath.

I like to set up a station doing the next part.  It can get really messy if you're not careful.  First, dip rings in the new milk bath and then individually into the crushed cracker.  Pat crushed crackers so that they cover the entire ring.  Periodically sift the crushed crackers to get rid of the little goobers that start to accumulate.

Carefully drop a few onion rings into the hot oil (I had my oil between 300* and 350*) and cook until golden brown (a few minutes).

Take out cooked onion rings and drain on a paper towel or newspaper.

Next comes the french fries.  The best homemade french fries take time.  Give yourself time!  


Ingredients:

Vegetable Oil, for frying
3 Bakers Potatoes (I used three and my family of 5 couldn't eat all of the fries)
Salt
Pepper

Directions:

For my fries, I like to use Bakers Potatoes.  I grab the potatoes that are the longest.  

First, I pealed the potato and then sliced it into long sticks.  Next, I put the potato sticks into a large bowl of water and let them sit in the refrigerator for about 3 hours until I was ready to use them.

When I was ready to make my fries, I heated my oil to 350*, drained the potato sticks and then dropped the them into the oil  (small bunches at a time...the oil bubbles up a lot so be sure not to overflow the pot).  I then gave the sticks a little stir so they didn't stick to each other.  Fry them for 1 - 2 minutes.  Remove and let drain on a rack.

After all the potato sticks are done frying, raise your oil heat to 375* and, again in small bundles, drop your fries into the oil again, this time frying for 4 - 5 minutes.  Remove from oil and let drain on rack.  Salt.

The fish was the last part of the meal I did.  It cooks so quickly and is best eaten when it is still hot (in my opinion).  When I do eat fish, the only fish I can stomach is white fish.  Our grocery store had some lovely cod so hesitantly I grabbed two fillets and went for it.  Having never made fish before, I went to THE man in the kitchen...Tyler Florence.  I found this recipe by him that looked easy enough.  The changes that I made are in green.


Ingredients

Vegetable oil, for frying
  • 2 cups rice flour (I used regular white flour)
  • 1 tablespoon baking powder
  • 3 teaspoons salt, plus more for seasoning
  • 1/2 teaspoon freshly ground black pepper, plus more for seasoning
  • 1 (12-ounce) can soda water
  • 1 large egg, lightly beaten
  • 2 (8-ounce) cod, cut in 1/2 on an angle
  • 1/2 cup rice flour, for dredging (Again, I used regular white flour)
  • Malt vinegar, for serving

Directions

Heat 3 inches of the oil in a deep fryer to 375 degrees F. Alternatively, use a deep heavy skillet.
Crank the oil temperature up to 375 degrees F. In a large mixing bowl, combine the flour, baking powder, salt and pepper. Combine soda water and egg and pour into the flour mixture. Whisk to a smooth batter. Spread the rice flour on a plate. Dredge the fish pieces in the rice flour and then dip them into the batter, letting the excess drip off.
Carefully lower the battered fish into the hot oil. Fry the fish for 4 to 5 minutes until crispy and brown. Remove the basket and drain the fish on paper towels; season lightly with salt. Serve wrapped in a newspaper cone with malt vinegar and/or tartar sauce.
Give these dishes a try and remember...its okay to make mistakes in the kitchen.  I have thrown entire pots of concoctions out before because they didn't turn out how I liked it.  That's how we learn. 

Enjoy!

Sara Jane


Tuesday, July 31, 2012

Allison: Trying To Find My Olympic Spirit

Hello, hello!  I try every week to come up with a greeting more creative than that, but I never can.  Oh well... I'll go with it.

This week has been all about the Olympics at my house.  As I have mentioned before, I am a VERY patriotic person.  I LOVE MY COUNTRY, and would defend it to the end.  But...  I have never been a huge fan of the Olympic Games.  There!  I said it!  I know... strip me of my patriotic title.  Something about sports taking over the television for multiples days just doesn't sound all that appealing to me.  That being said, I will always tear up every time the National Anthem is played with an American standing on the podium.  Go figure.

With as much passion as I DON'T enjoy the Olympics, my good husband DOES.  Of course.  So, I try not to whine too much while the t.v. is on and give him these few days to watch all the "sports" (ping pong... really?) he can handle.

Today I thought I'd try to support my husband and his love of the games, by making something "British" for dinner.  He might pass out at the thought of me even making dinner, let alone something to celebrate the Olympics, but that's okay.  I like to shock him every now and then.  For my British dish, I thought I'd make shepherd's pie.  I've made it before, and it really is the perfect dish.  Anything that is topped with mashed potatoes and cheese has to be amazing, right?  But I thought I'd try an idea I saw on Pinterest, and make mini-pies.  I had some pie crust in my freezer, so it was really a no-brainer.  I mostly followed the recipe found here.  I did make a few changes.


Ingredients

  • 1 pound ground beef
  • 1 medium onion, chopped
  • 1 (10.75 ounce) can Campbell's® Condensed Cream of Mushroom Soup (Regular or 98% Fat Free)
  • 1 tablespoon ketchup
  • 1/8 teaspoon ground black pepper
  • 1 cup frozen peas and carrots  (I left carrots out this time, but did add corn that was already in the fridge.)
  • 1 cup milk
  • 2 tablespoons butter
  • 1 1/3 cups instant mashed potato flakes or buds (I used about 5 small-medium potatoes that I had in my pantry.  No fake potatoes in this house!  I probably should have used a couple more.)

No judging my stained muffin tins.  :)
Start by peeling, cutting and boiling your potatoes.  While the potatoes were boiling, I took my pie crust and cut out circles using a cookie cutter.  I probably should have used 2, because 1 crust only filled 9 muffin tins.  But, I figured I'd go with it and just add any left over filling to a normal dish.  I baked the crust for 7 minutes at 400 degrees in the oven.  

While the crust cooled, I sauteed some onions, and then cooked up the ground beef in the same pan.  I then added the soup, ketchup (which I couldn't even taste later), pepper, peas and corn.  

While that simmered, I took the potatoes, mashed them (adding the milk, butter, salt and pepper), and put them to the side.

I then spooned the beef mixture on top of the pie crust, followed by a topping of mashed potatoes and a sprinkle of cheese.  

Finally, stick the tin in a 400 degree oven for 8-10 minutes, or until the cheese is sufficiently melted and gooey looking.  Yum!

**I did end up having enough filling to make a separate "pie" in a glass pan, and topped it with the remaining potatoes and cheese.  Obviously this was my first time trying this recipe with pie crust.  :)

Can you really argue with these results?  :)  He said they were very good, and I have to agree.  Totally worth the heartburn that I'm sure will hit soon.  I may always add a crust to my shepherd's pie dishes in the future.  The flaky crust was the perfect compliment to the meat and potatoes.


I hope you're all enjoying the Olympics and feeling your American pride swell just a little for our amazing American athletes.  Have a great week!!

Allison

Monday, July 30, 2012

Lisa: Olympic Medals


Olympic Medals

Hello, hello!!  What a fun week with the Olympics coming up!  We are very excited here to see, hear and read about our favorite events!  One of the things that I did for my kids was to make them Olympic medals.  They are super easy and a fun way for kids to participate and feel part of the Olympic Games!

Supplies:
Licorice Ropes (I couldn't find them so I used individually wrapped licorice taped together)
Chocolate Coins
Glue or Tape

Directions:
Tape or glue the ends of the licorice rope together and glue or tape on the chocolate coin.  Easy and fun. 

My kids each declared that they were the gold medal winner and posed for some fun photos!

Hope you are enjoying the Olympics and GO USA!!!

Lisa