Showing posts with label patriotic. Show all posts

Wednesday, June 27, 2012

Sara Jane: Fireworks and a treat


Hello hello hello!

I love the Fourth of July.  Not only do we get to celebrate this spectacular country of ours but we get to blow things up.  Who doesn't enjoy doing that???

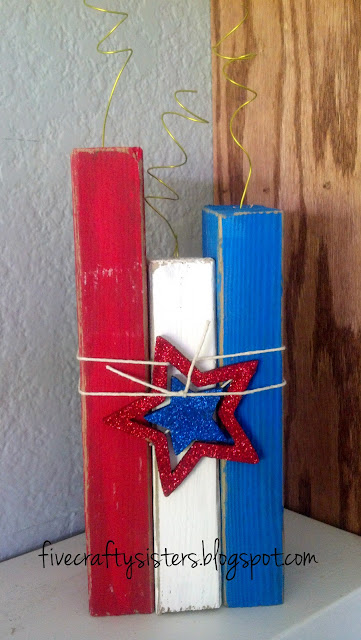
For my craft  you will need:


Wire cutters, wire (I used 22 GA), twine, paint (red, white and blue), a fancy star, sandpaper and wood.  The wood can be any size you like.  I used an old 2 x 4 piece of wood I found at my in-laws house and cut it into 3 pieces - a 10 inch, an 8 inch and a 9 1/2 inch piece.  (AND just in case you're wondering....I CUT the wood.  This is huge for me because I usually just have my hubby do all the work when it comes to power tools.  I'm now looking forward to my next project.)

First, paint your wood.  I like a more distressed looking piece of wood so I only did one coat.  If you want a more solid color, do two or more coats until it looks how you want.  Again, since I like the distressed look, when the paint was dried, I took a piece of fine sandpaper and lightly sanded the corners.

Next, I cut three pieces of wire.  I first tried the silver wire but you could hardly see it so then I tried the gold wire and it was exactly what I wanted.  Each piece of wire is several inches long.  I cut it long enough to be able to manipulate it and still have length.

Next, I drilled 1 hole in the center of the top of each block of wood.  Each hole is approximately 1 inch deep.  Use your smallest drill bit when doing this.  When your hole is done, stick the wire in.  If you are having a hard time getting it to stand up, maybe try a small dab of hot glue.

Finally, wrap your twine around the blocks of wood and decorative star.  Does it look something like this....


 Finally, everyone (except my Penelope) loves to watch fireworks, right?  Why not have a tasty snack while you are enjoying your Fourth festivities.


Simple Caramel Popcorn

This recipe is a favorite for movie night at my house.  The best part about it is that there is always left over caramel to be used to dip apples in, drizzle over a yummy spice cake, or to just eat with a spoon, like I do.  I know a lot of people like the kind of caramel corn that is baked in the oven.  If you are one of those people, this is probably not the recipe for you.  This caramel popcorn is a delicious mess.  My kids usually end up having sticky hands, faces and hair when they are done with this treat.  We like a good mess around here.

Enjoy!  

Ingredients:

1/2 cup butter
2 cups packed  brown sugar
1 cup light corn syrup
2 T water
1 (14 ounce) can sweetened condensed milk
1 T vanilla extract
3 bags of microwave popcorn.

Directions:

Pop popcorn.  I tend to use microwave popcorn because it is so convenient.  Use light butter flavor.  The full butter flavor just is too much with this recipe.  If you want to use air-popped, it tastes just as yummy :)

Combined all ingredients, except vanilla, in a large sauce pan over medium high heat.  Stir until butter melts.  Watch the mixture carefully as it can burn quickly.

When the mixture comes to a soft boil, continuously stir for 3 minutes to dissolve the sugar.

Take the pan off the heat and add vanilla.  Stir until combined.

I have found that the easiest way to combined popcorn and caramel is to do it in a LARGE pan.  I like to use my roasting oven pan.  That being said, pour 2 cups of the caramel over the popcorn and mix with a large spoon (I use a spatula...easier to clean).

Save remaining caramel in an airtight container in the refrigerator.  It saves pretty well for a few weeks.

*NOTE*

Most of the recipes I make are kid friendly in that the kids can help make them.  THIS IS NOT A KID FRIENDLY RECIPE!  Please make sure you know where your little ones are when you are making this recipe (and whenever you are using the stove/oven).  The caramel is so hot and can do some major damage in very little time.

Happy Fourth of July!

Sara Jane

Tuesday, June 26, 2012

Allison: Patriotic Treat and Kids' Craft


I LOVE THE UNITED STATES OF AMERICA!  It's true... I consider myself to be a very patriotic person, and LOVE any holiday that celebrates my country.  I lived in Spain for 18 months as a missionary for my church and didn't realize just how much I loved my country, until I was away from its soil.  Every time I would see an American flag, I would get emotional and instantly homesick.  That being said, I'm excited to share a patriotic-themed dessert/appetizer recipe and kids' craft with all of you today.


I took my inspiration for these cute little cupcakes from here.  I loved the idea of a bite-sized dessert that wouldn't be TOO messy.  They were surprisingly easy to assemble and even easier to snack on in the process (tee hee).  Here's what you'll need:


Duh.  You could probably figure out those ingredients.  But I'm going to share the whipped cream cheese frosting recipe that I discovered, and you are going to thank me (or curse me)!  Of course I found it through Pinterest, on this site , as a cinnamon roll topper.  I may never make another cream cheese frosting again.  It is amazing!  I had to stop myself from sampling it too much, before it was all gone.  This would work great for a standard size cupcake too, but I liked the idea of a bite-sized treat, so I used the mini cupcake tin.  The adorable little pinwheels I found in Target's dollar section, and worked great to secure the stack.  I love them!


Here's the frosting recipe:

Ms. Humble's Whipped Cream Cheese Frosting

16oz cream cheese, room temperature
1 1/2 cup powdered sugar
1 teaspoon vanilla
1 cup heavy cream, cold

Beat the cheese, sugar and vanilla until smooth and fluffy. In a separate bowl, beat the heavy cream to nearly stiff peaks, then add the whipped cream into the cheese mixture and quickly and briefly beat to combine. Do not over beat.


Mmmm... So good...


This patriotic craft came from a cute blog I came across called "Random Thoughts of a Supermom".  This mom is so creative and I loved that she involved her kids in the project.  I planned to replicate her version of this windsock but wouldn't you know it... I got lazy.  So instead, I thought I'd share my version.  Maybe not AS cute, but still a little cute and definitely kid-friendly.

You'll need these things:

* blue plastic cups
* red & white crepe paper
* tape
* star stickers


This little guy was so easy to assemble!  I just taped alternating red and white crepe paper to the inside of the cup, and poked a little hole in the top to string some white ribbon to hang it up.  Next, grab your star stickers and stick them on.  Done!  I didn't think my two-year-old could handle this yet, but I think this craft would be so fun for kids!


The blog I "borrowed" the idea from used empty baby formula canisters and spray painted them blue.  She also used ribbon instead of crepe paper.  Either way, I think they're a great way to decorate the outside of your house for patriotic holidays.  

Before I end this post, I wanted to advertise to our faithful readers and friends the special I'm offering this week on our Etsy page.  I'll be selling my 9" Patriotic Rag-Tie Wreath until the 4th of July for only $10 (instead of the $15 it sells for on Etsy).  Any local orders can be hand-delivered also, saving on shipping.  For any out-of-state orders, I'll give you a discount on shipping (only $3, instead of $5).   Message me or leave a comment and I'll create a posting for you where the discount is applied. 

Get your wreath now!!  :)


Well, I hope you enjoyed my easy dessert and craft!  Even more, I hope you enjoy celebrating our freedom this 4th of July.  May we always remember those that have fought and continue to fight for that freedom.  Happy Independence Day!!


Allison


Tuesday, May 15, 2012

Allison: Patriotic Wreath Tutorial and Giveaway

  **Giveaway is now closed**
Wreath is available in our Etsy shop: http://www.etsy.com/shop/fivecraftysisters

Hello, again!  I hope everyone had a relaxing Mother's Day!

I'm so excited for this week's theme!  I LOVE Memorial Day!  I consider myself a very patriotic person, and relish any opportunity to be reminded how blessed I am to live in this free country and to celebrate all those who protect/have protected that freedom.

For this week's post, I did some "research" on Pinterest and found this cute wreath made of tulle.  There was only one thing wrong with this wreath:  I am WAY too lazy to tie that much tulle!!  But it did remind me of a scrappy fabric wreath I attempted for Halloween last year.  I knew I had most of the fabric I would need, and knew where to get the rest of the supplies for CHEAP.  Here's what you need:

* I found this 9" wreath at the dollar store.  Perfect!  A little small, but that means less work.  :)

* Ribbon for hanging, if you choose (dollar store, again).  I have a wreath hook, so I didn't use mine.

* The stars I found at Joann's for $.29/each!  I only ended up using one.

* Fabric.  This is a great project to use your extra scraps of fabric.  I had all but the blue, which I found at Joann's in the Fat Quarters section.

This project is great, because there's no right or wrong way to do it.  I chose 3 different fabrics of each color.  I cut the pieces 1 1/4" wide and 9-10" long.  Some were thinner or shorter, depending on what scraps I had.  Anything shorter than 9" was a little harder to work with, but still doable.

Next, start tying!  I double tied one piece of each fabric, alternating between red and white.  If you look at the wreath as a clock, tie red and white from 12 o'clock to 9 o'clock (or 3/4 of the wreath).  Then tie your blue pieces the rest of the way.

You can nest the knots together if you don't want as much of the wreath showing through.  Or you can spray paint the wreath white before you start tying fabric.  (I did this with my Halloween wreath and it worked great!)


That decision might be the toughest part of this project.  :)  I liked it both ways, but decided to paint my little star and hot glue it on.  Multiple smaller stars could be cute too.

**THE GIVEAWAY**

Okay... now the fun part!  Leave a comment below answering one (or both) of the following questions:

* What do you like most about our blog?
* What would you like to see more of on our blog?

 If you aren't one of our Facebook friends, I'll also need your email address included in your comment (or you can email it to us at fivecraftysisters@gmail.com).  You have until Sunday night to enter.  Good luck, and Happy Memorial Day!!


Allison