Showing posts with label Sara Jane. Show all posts

Monday, May 27, 2013

End of the Year Teacher Gift

Hello blogging world!  Oh, how I've missed you!  

This past week, my little girl graduated from Pre-K (AND had her cast taken off, AND had her first loose tooth...big week for us!). 


I have to admit, tears were shed.  I wasn't quite prepared to experience the flood of emotions that I did as I watched Penelope give her sweet teacher, Ms. Amanda, a hug for the last time and then to see the tears in Ms. Amanda's eyes....very touching!  Penelope had the most amazing teacher and I was so thankful that she was Penelope's first school experience.  

Both Penelope and I have been thinking for along time about what we should do as a thank you for all the hard work Ms. Amanda put in this past year.  We finally came to the following project.  I am all about a heart-felt, homemade project to show someone how much you appreciate them.  We actually went out and bought her a really cute coffee mug (she's an avid tea drinker) but I really felt that there was no heart in it so it is still sitting on my piano instead.

All of the materials needed for this project were in my craft supplies.  For Christmas, I made my hubby a magnetic Scrabble game so everything was left over from that project.  If you don't have these items just laying around, check your local Goodwill of DI game section to see if they have any Scrabble games.  I know you can also buy some letter tiles at craft stores - I just like the real Scrabble tiles.  The rolled magnet strip was purchased at Joann's.  My kids love to make magnets so we ALWAYS have this at my house.


To assemble the magnetic letter tiles, simply cut a piece of magnet to fit the back of the letter tile and glue it on with the hot glue gun.  The magnetic strip will have some adhesive on it but I have learned from previous experience that it needs a little extra glue to stay long term.  

For my "cookie jar", I found a cool old jar in my collection and then found a metal lid that fit the top.  Penelope painted the lid Ms. Amanda's favorite color.  Then we stuck the letters to the lid, filled the jar with cookies and this is what you end up with...


Here is a picture without the magnets on top.


We paired this gift with a homemade card from Penelope to Ms. Amanda.

As for the cookies, this is my new favorite cookie recipe - peanut butter and chocolate chip cookies.  I have NEVER liked peanut butter cookies until I found this recipe from my favorite cookbook, The Grand Central Baking Book.  Now, MY peanut butter cookies are my favorite cookies.  I altered this recipe and added milk chocolate chips and it is even better!

Peanut Butter Chocolate Chip Cookies

Ingredients:
* 3 cups all-purpose flour
* 2 teaspoons baking soda
* 1 teaspoon salt
* 1 cup butter, at room temperature
* 1 cup granulated sugar, plus extra for rolling the cookies
* 1 cup packed brown sugar, light or dark
* 1 cup peanut butter, at room temperature
* 2 eggs, at room temperature
* 2 teaspoons vanilla extract
* 1 bag (or approximately two cups) milk chocolate chips

Directions:
1.  Preheat the oven to 350*.  Line baking sheets with parchment paper.  Put one cup of sugar into a medium bowl for rolling the cookies.
2.  Using a mixer with a paddle, beat the butter, granulated sugar and brown sugar on medium speed for 4 minutes, or until mixture is lighter in color and fluffy.  Add the peanut butter and cream for another minute.  Scrape the bottom and sides of the bowl several times during this process.
3.  While the mixer is running, crack the eggs into a cup and add the vanilla.  Do this to ensure you don't get egg shells into your dough.  Reduce the speed to low, then slowly pour in the eggs, letting them fall in one at a time and incorporating the first egg completely before adding the next.  Scrape the bottom and sides of the bowl once during the process.
4.  Measure the flour, baking soda, and salt into a bowl and whisk to combine.  If flour or baking soda is clumpy, sift the dry mixture.
5.  Gradually add the dry ingredients (in two or three additions) with the mixer on low speed.  Scrape the bottom and sides of the bowl.  With the mixer on low, add the chocolate chips.
6.  I like to use a tablespoon scooper for my cookies so they are all about the same size.  Scoop out your dough, using your hands, roll the dough into a ball then roll the ball in the sugar, coating completely.  Place on the cookie sheet.
7.  When your sheet is full of cookie balls, lightly dust your fork with sugar or flour before pressing  to make a crisscross pattern and then press the cookies into 1/2-inch-thick disks.
8.  Bake for 10 to 12 minutes or until the edges are LIGHTLY brown.  I discovered the reason I don't normally like peanut butter cookies is because most people cook them until they are crispy.  I don't like that. I like a soft cookie.  If you want it more crispy, cook longer; otherwise, allow the cookies to rest on the sheet for three or four minutes before transferring them to a wire rack to cool (although I ALWAYS have to have at least one hot, right-off-the-cookie-sheet, gooey cookie).

Yum!

Stay tuned the next several months for some big projects I will be working on in our new house we move into this week.  They include reclaimed barn wood flooring and a new kitchen!  I can't wait to show you!

Sara Jane


Thursday, November 15, 2012

Sara Jane: Test Kitchen

It seems I have been spending most of my days in the kitchen lately.  It always happens this time of year and....I LOVE IT!

Last week, I had my 6th annual Cookie Swap!  It was a blast.  If you have never been to or heard of a Cookie Swap, you really must find one to go to.  At my cookie swap, we each brought 6 dozen cookies and a dish to share.  Then, for a few hours, we ate, gabbed and exchanged cookies.  Always a highlight of the season for me!  I am already planning next year's event (too early???).

For today's post, I am being your test kitchen.  There are so many recipes on Pinterest that look too good to be true so I am testing them out for you.  Some worked marvelously....others not so much.  I will share the link to where the recipe is originally posted and then share with you any changes I made to the recipe and/or my review of the recipe.  Here we go....

PF CHANG LETTUCE WRAPS

I discovered PJ Chang Lettuce Wraps a few months ago thanks to my beautiful friend, Amy.  I am in love with them.  I would eat them daily if I didn't live so stinkin' far away from our PF Chang.  I have, however, been known to crave them and drive the 1.5 hour round trip just to be able to fulfill that craving.  Worth every mile, I tell you!

I always see recipes on Pinterest claiming to taste exactly like the original PF Chang recipe.  I found one yesterday that made my mouth water so today, I tried it.  The recipe can be found here.  I really didn't change the recipe at all other than I used ground chicken instead of whole pieces.  Does it taste exactly like the original recipe....no.  Is it good....yes!  I can't quite figure out what is different so I think I will go grab an order of Lettuce Wraps at PF Chang and try to figure that one out.  Do you see how much I love all you blogger friends :)


PUMPKIN BROWNIES

This next recipe I saw just a few days ago.  You've probably seen it, too.  Check it out here if you haven't.  You take one boxed brownie mix and add one can of pumpkin to it and bake it as you would normal brownies.

I didn't love this recipe.  In fact, I REALLY didn't like it.  Here are my thoughts.

1.  I love batter.  This batter was not good.  I mean, REALLY NOT GOOD!  That should have been my first clue :)

2.  The original recipe says to bake it for 25 to 30 minutes...it took me an hour and ten minutes to get the thing to set!  Even then, it was super gooey (and not the good kind of gooey).

3.  The taste just isn't quite right.  I love pumpkin and chocolate together but you couldn't taste the pumpkin.

Bottom line...I will not do this recipe again.  I would rather continue to make my brownies from scratch or, if I do use a boxed brownie mix, do it how they recommend on the back :)

SINGLE SERVE CHOCOLATE CHIP COOKIE

I try not to eat many sweets so we usually don't have many sugary items in our house.  However, sometimes I get crazy cravings, usually involving chocolate, and when I do, I always go to this next recipe.  

Some people call it chocolate chip cookies in a mug but this blog has the best version I have seen of the single serve chocolate chip cookie (and believe me, I have tried several versions).  Does it taste exactly how a chocolate chip cookie SHOULD taste?  Not so much but it is really yummy and always fulfills my craving for chocolate.  I would change nothing about her recipe.  I only should warn you that you may want to have a glass of milk next to you with this dessert.


TAKE-OUT, FAKE-OUT BEEF & BROCCOLI

I don't remember loving broccoli as a child.  If my memory is correct, it was Allison who liked it.  As an adult however, I LOVE broccoli.  I actually have a post ready about my (and my children's) three favorite ways to cook broccoli...another day.  I really could eat broccoli for every meal.  Yum! So, when this recipe popped up, I tried it right away. 

The only thing I changed about this recipe is that after the meat was mostly cooked, I added 2 to 3 Tablespoons (I can't remember exactly but I think it was 3 T) of brown sugar to the meat and let it create a glaze on the meat.  It makes it have more of the Mongolian Beef flavor but I like the sweetness.  Other than that, I changed nothing!  Make sure not to let your broccoli cook for too long otherwise it becomes super soggy.  Serve over rice and maybe with this salad (which is also a fav of mine).

If you guys can't tell, baking/cooking brings so much happiness into my life.  I know there are so many people out there who really don't understand that but it is 100% true.  Just remember, like I have said several times before, its OKAY to mess up and order your favorite pizza instead.  That's how we learn and how we figure out what we like and don't like.  I will continue testing out recipes and get back to you with another Test Kitchen Post beginning of next year.  

QUESTION:  Are there any recipes out there that you're wondering if they really work?  Let me know and I'll try them out for you :)
Loves!

Sara Jane

Thursday, November 8, 2012

Sara Jane: Thankful tree and Chicken Curry

November is always the month that I take a little more time to think about those things in my life that I truly am thankful for.  I know I'm not the only one because my Facebook feed is full of what everyone else is thankful for, too. :)  I enjoy reading what others are grateful/thankful for.  It makes me smile.

When my oldest, Penelope, was just a little baby, I started a thankful tree and have been doing it ever since.    It is nothing fancy.  I simply cut out a brown tree trunk with a few branches and then everyday in November, we each write something (or in Penelope's case, 5 somethings) we are thankful for on simple little leaves.  Our first tree was very small.  Now, with five of us writing thanksfuls on it, the tree has become quite large.  It takes up the entire side of my refrigerator.  Not the prettiest site to see but it warms my heart whenever I see it.


The tree looks quite bare right now but by the time November is through, our tree  (and refrigerator) is  overflowing with leaves.
Now, the fun part.  When November is through and it is time to put up all my fun Christmas decorations, we carefully take off all the leaves and put them in a labeled box.  Each year we have done this, I have simply put the boxes in storage.  This year, however, we are going to wrap the small box up and make it into an ornament on the Christmas tree.  I really think it will be fun to someday look at these when my children are grown.

Now that Penelope writes, it is really fun to help her spell out what she is thankful for.  
I can't leave with out sharing with you my favorite recipe.  Chicken Curry.  I never knew I liked chicken curry until several years back when we went to our friend's house for dinner and they served it. It was like love at first sight! Amazing! After this heavenly meal, the search was on for the perfect chicken curry recipe that I could actually make. While trying to use up a gift card at Borders, I found a rather intimidating Indian cookbook called The Complete Book of Indian Cooking.  It is now the ONLY curry recipe I use.  The recipe may look overwhelming at first, but don't be fooled. If you can follow directions, then you can make this recipe. The spices can be found at most supermarkets. I buy mine in bulk at a specialty store but I have also found them at Safeway and Albertson's (they just tend to be more expensive there).  If you really can't find the spices locally, try this ordering them online here.  The spices that are in this recipe are always in my cupboard now and I do buy them in bulk to make sure I ALWAYS have them.  I have made this recipe probably 100 times and have altered it a bit so I will give you my version of the recipe.  Here you go....

Chicken Curry


Ingredients:
4 tbsp vegetable oil
4 cloves
6 green cardamom pods
1 piece cinnamon stick (2 inches long)
3 whole star anise

1 large onion, finely chopped

4 cloves garlic, crushed (If you buy already minced garlic like I do, I add 4 teaspoons)
4 tbsp mild curry paste
1 tsp turmeric
1 tsp five-spice powder
3 lb chicken, skinned and chopped into bite size pieces 

14 oz. Canned tomatoes, chopped
4 oz. Creamed coconut (sometimes I add an entire 14 ounce can for a more mild, soupy curry)
 2 cups fresh cilantro, chopped

Directions:
1. Heat the oil in a pan at a medium high heat and fry the cloves, cardamoms, cinnamon stick, star anise, and curry leaves until the cloves swell.  About 5 minutes should do the trick.  You will know its ready when you can smell all the spices.
2. Add the chopped onion, and garlic and fry until the onion turns light brown. Add the curry paste, turmeric and five-spice powder and fry until the oil separates.
3. Add the chicken pieces and mix well. When all the pieces are evenly covered, cover and cook until the meat is nearly done.
4. Add the chopped tomatoes and the creamed coconut. Simmer gently until the coconut dissolves. Mix well. Fold in the chopped fresh cilantro, then reheat and serve hot.  I never find that this needs salt but if yours does, then add it.


We usually eat our curry over rice but lately it just feels like too much food so I eat it as a soup instead.  If you are feeling extra adventurous, try this naan recipe.  It is delicious and goes excellently with the curry.

We had extra tonight, so we gave some away.  
One last thing before I end my longest post EVER!  One month ago, we acquired our dog, Jack.  I have never really been a fan of dogs but seeing that my husband and children all wanted one, I thought it was probably time we get one.  We looked for months but couldn't find one that went well with our family.  Then one day, everything fell into place and Jack moved in with us. This dog is incredible.  He is gentle (well as gentle as a 105 pound boy can be) with the children and follows me everywhere.  He has melted my heart. So, today, I am thankful for my new buddy, Jack.  He has been the perfect addition to our family!


Friday, October 26, 2012

Sara Jane: Berry Crisp

For the past two weeks, I have had the opportunity to serve a sweet friend of mine, who has been in need of a little extra TLC, by taking her dinner.  My sweet friend is gluten intolerant so I have challenged myself to find delicious recipes that are within her strict dietary guidelines.  I have had so much fun doing this.  You would think that cooking for 6 extra people would be difficult but it really has been so easy and quite relaxing.  I don't know how else to describe it.  I have LOVED every minute of it and have found some pretty yummy alternatives to foods we eat all the time.  I will be compiling the recipes I have made along with some other delicious finds in a blog for my friend.  I am sure she won't mind me sharing the blog with you when it is finished.

With each yummy meal, I have tried to make a dessert that goes along with it.  I usually alternate between a fresh fruit dessert and a gooey chocolate dessert.  Yesterday, I made a creation that I know isn't new to anyone but it was so tasty last night at 10:00 PM that I have to share it with you.


Berry Crisp

I call this "Berry Crisp" because you could use any berry in it and it would still be delicious.  We happen to have raspberries so that is what I used.  I would just make sure to adjust the amount of sugar you use if you use a less tart berry, like a blackberries or blueberries. 

The only way this crisp is really different from other crisps I have made is that I didn't use flour in the topping.  Last week, I made my friend an apple crisp and used quinoa flour in the topping.  I didn't like the after taste that the quinoa left so I omitted that this week and actually enjoyed it better than my usual crisp topping.  

Ingredients:

4 cups berries (I used frozen berries from this summer; fresh would be delicious, too)
1/4 to 1/2 cup sugar (depending on how sweet you want your berries)
2 Tablespoon cornstarch 
1/2 cup melted butter
2 cups rolled oats
1 cup brown sugar

Directions:

Preheat your oven to 375*.

Toss your berries with the cornstarch and sugar, coating the berries. Set aside.

To make the "crisp" topping, combined your oats and brown sugar.  Pour your butter over the oats/brown sugar and mix together.  It should be very clumpy.  If it isn't, add more oats until it is.

To assemble the dessert, I filled small jars 1/2 way full of the berry mixture and then topped them with the crisp mixture.  When you have both in there, you should have your jar about 3/4 full.  Leave some room so when the berries start bubbling they don't over flow.

I put the full jars onto a pan (to catch any runaway berry juice) and cooked them for about a half hour or until the topping was nicely browned.

Since I was taking these to my friend and not eating them right away, I let the jars cool for about 10 minutes and then capped the them with a lid and a band.

* I find that when I make berry crisp with just sugar, the juices are too runny.  The cornstarch thickens the berry juices giving it more of a sauce feel.  If you don't care for that consistency, omit the cornstarch and just use the sugar.  

*If you feel like you need more or less of the oats, sugar and/or butter for the topping, then adjust to what YOU like.  We like a lot of oats in our topping so I tend to put a bit extra in.

*Since I knew a jar portion would be too little for my hubby, I cooked his crisp in an cereal bowl that was oven safe and it was the perfect portion for him. 

I really am so grateful for the opportunity to serve and hope that I can always serve with a happy heart, even if it doesn't involve food :)

Loves

Sara Jane

Tuesday, October 16, 2012

Sara Jane: Felt Pumpkin Bags

***Giveaway is now closed***

Have I told you how amazing my/our mother is?  Well, she is.  She always has been, too.  She was the mom who was always volunteering in the classroom.  She would give demonstrations at school on how to make bread or sew an apron.  She made (back when you could take homemade treats) birthday treats for the class when our birthdays came around (keep in mind she had 7 children).  She was very involved in PTA (her fundraisers funded the new playground when I was in elementary school).  She was/is amazing!

One of the fun things I remember her doing for at least a few of my school classes were pumpkin bags for Halloween.  She would spend hours cutting and sewing the bags and then stuff the cute bags with little treats and plastic spiders.  

A few years ago, I came across one of my pumpkin bags from my childhood.  At this time, Penelope was just beginning to understand how fun Halloween and other holidays were.  I made a pattern off of the bag, made 10 bags, and then Penelope and I took them to her favorite people (I think one actually made it back to my mom).  We had so much fun doing it that it has now become a tradition in my family and I hope to someday get to take a tray of them to my children's classes.

With special permission from my mother, I am going to share these bags with you.  Here we go...


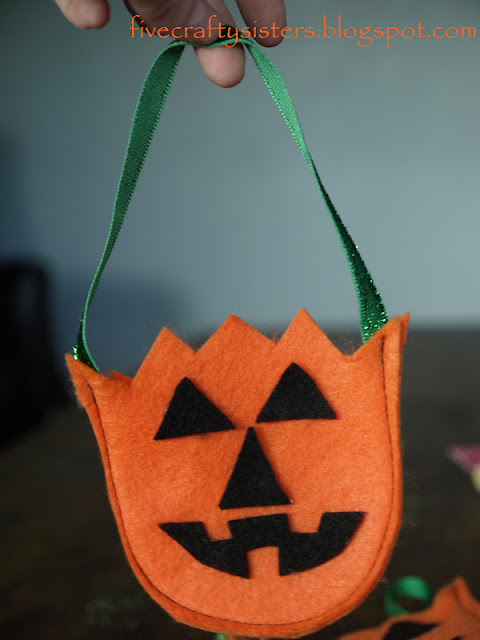
First, you will need black and orange felt and ribbon for the handle.  My mom always used green ribbon so that is what I have used. First, cut out a pumpkin, a mouth, a nose and two eyes.  For the nose and eyes, I just cut random triangles so each pumpkin was different.  If you would like a copy of the template I used for the pumpkin and the mouth, either leave your email in a comment or email me at fivecraftysisters@gmail.com and I would be happy to send one to you.  I could not get the template uploaded.  Next, using your hot glue gun, glue on the eyes, nose and mouth making sure to leave enough room for a seam.


Next, you sew the pumpkin together, making a bag.  A few things to remember: (1) be sure to add the ribbon into the first few stitches, (2) make sure to back stitch the beginning and end and (3) make sure to keep the top open - You may be thinking "duh"...I've sewed the top shut before :)

I had quite a difficult time sewing these little guys this time around.  My thread kept breaking, my needle broke....needless to say, these bags are in no way perfect but I am sure the children who receive them will still love them.  I tried hot gluing the pumpkin pieces together and it worked really well.  I just like the look of the black thread on the orange felt :)


When you are finished sewing, this is what your bag should look like.


We like to fill ours with our favorite candy and I always add, just like my mom did, a plastic spider ring.  This year, we are also adding Dracula teeth.  


Penelope can't wait to hand out her favorite little goody bags.  


Now for the giveaway that I promised back here...

I will be giving away TEN pumpkin bags to one lucky reader (treats not included). 

All you have to do to be in the running to receive these is leave a comment on what your favorite holiday tradition is in your family.  This giveaway will close at 12:00 AM on Saturday morning.  That way I can mail the bags to you in time for Halloween.


 I hope you guys enjoy these bags as much as we do around here.

Sara Jane

Wednesday, September 26, 2012

Sara Jane: DIY Gifts

I am one of those annoying people who has 99% of their Christmassing (yes, that is a word in my home) done December 1st EVERY year.  I do if for two reasons: (1)  I LOVE the entire process of buying/making gifts and then giving them to others and (2) So I can really enjoy the entire month of December and focus on the family traditions that we have created within our own little family.

During the year, when I am out shopping, I am constantly thinking of who would like what.  Two years ago, I had my children's entire Christmas done in January (there was a fantastic sale I could not pass up).  This year, however, I have been slacking soooooo, I thought I would share with you some of the projects I have recently started working on for Christmas.  I love doing homemade gifts, especially for my children, so I can personalize the gift for the person who will be receiving.  Here are a few that I've started....

1.  Car Caddy
2.  Doll with carrying case
3.  Mini Coloring Tote
4.  Magnetic Scrabble Board
5.  Little man ties
6. Sticky Grams (such a cute idea for grandparents!)

I just finished one super simple gift this weekend and wanted to share it with you.

I went to our local Habitat for Humanity ReStore this weekend looking for materials that would inspire me to do something crafty.  This store is one of my favorites!  Not only do they serve a pretty incredible purpose but they have random parts and pieces that you can't find anywhere else.  We got our beautiful claw foot bathtub at our ReStore for a steal!

Anyway....while there, I discovered their tile section.  After holding a tile for probably 3 or 4 minutes, I remembered seeing a coaster somewhere that a person had made from a tile and some modge podge.  Perfect!  I grabbed a few tiles (only $0.10 each!) and headed home.

For this coaster project, you will need, tiles (however many you want to make), mod podge (mine is homemade - Just a 50/50 mixture of Elmer's glue and water), decorative paper, felt, a clear high-gloss spray paint (not pictured), and a hot glue gun.


First, cut your paper so that the paper squares are just slightly smaller than your tile.  Next, paint your tile with a thin layer of mod podge.  Place your decorative paper on top of the tile/mod podge.  Paint another layer of mod podge over the decorative paper.  Allow to completely dry (I had them dry over night) .  Finally, spray a coat of clear high-gloss spray paint on top.  To finish off the coaster, cut out felt squares to line the entire bottom of the tile (I simply traced the tile onto the felt) and glue them on with the hot glue gun.  So simple and they turned out really cute.


There are so many ways that you could personalize these coasters.  I will be making some for a certain family member that will have pictures on top of the decorative paper.  Another fun thing you could do is to first paint the tile and then add paper/pictures.  Or, how about adding stickers to say something fun.  The possibilities really are endless.

Until next week...

Sara Jane

Tuesday, September 18, 2012

Sara Jane: Spray Paint

A few years back, I discovered spray paint and all the fun, amazing, creative ways that you can use it.  My last spray paint project was our TV stand.  It is BRIGHT yellow and so very pleasant in our family room.  I haven't used spray paint in quite a while though so I decided today would be a good day to get reacquainted with my old friend.

For this project, I went to our local Goodwill store and found these three great pieces:  two tins (each $0.99) and one ceramic rooster ($1.99).  Then I headed to Joann's (which happens to be next door) and picked out a few colors that I liked.  If you don't want to spend oodles of money on spray paint, Walmart has cans for only $0.99!  Its not the most quality spray but it works fine.

Anyway, here are the three pieces I bought today:


First up was the rooster.  I have a special place in my heart for roosters.  Last year, we bought four chickens.  My chicken's name was Mrs. Pettitoes.  She was absolutely beautiful but one Sunday, when we came home from church, she was crowing at our back door and we realized that Mrs. Pettitoes was actually a MR. Pettitoes.  I was sad....

Anyway, I love roosters.

For my rooster, I wanted him to be a deep red.  To start, I sprayed my first coat and let it dry for about 15 minutes.  Then I sprayed another one.  Remember to use short, even sprays for the most even color.  After that coat, I only had to do a few touch up sprays in little cracks and here is how he turned out...


We don't have a permanent home for him yet but I am hopeful that he will have a nice place in my kitchen one day soon.

Next up were my tins.  I have seen spray painted tins all over Pinterest lately so I thought I would give it a try.  Well, the first tin (the one with the handle in the picture above) didn't turn out so well.  Since it is rather hideous (very gloppy and runny), it is now a small trash pail in the backyard for the kids.  The second time, I remembered to slow down and take my time (something I am constantly reminding myself of).  This one turned out perfectly!  For this tin, I sprayed very small areas to start. It took me about three coats and about 30 minutes to get it just right.  It turned out the perfect color and really transformed the tin.


I will definitely be spraying more tins around the holidays to use as the wrapping for gifts.  I love how they look!

Since I had this beautiful tin, I decided that today was a good day to do the cookie of the month for my father-in-law.  I tried out something new and loved how it turned out.

Using my favorite pie crust recipe, I made little cookies (simply make the dough and shape it how you like, sprinkle cinnamon sugar on the top then bake them at 450* for about 7 minutes or until lightly browned).

While I could eat pie crust all day long, I know not everyone likes it so I put a small jar of some pear jam my husband just made in the middle.  We had to test everything out before we gave them away and let me tell you, they were scrumptious!  It tastes exactly like you are eating a bite of pear pie.


I have decided that I will one day soon make an entire platter of these pie crust cookies and then put out all my favorite jams - blackberry, strawberry, pear, peach- and just eat pie all day.  Yummmm!

Happy crafting, my friends!

Sara Jane

Wednesday, September 12, 2012

Sara Jane: Pumpkins!

Hi friends!

From now until January, be prepared for way too much excitement in my posts.  Like I told you last Wednesday, I LOVE everything about September, October, November, and December.  I love all the food, the decorations and the overall excited/giving spirit that most people seem to have.  

I'm not sure if it is the changing of the seasons or what but I have had way too much happiness in me the last few weeks.  Its the kind of happiness that all you want to do is turn the music up way too loud to sing and dance.  Yesterday, I tried to channel that happiness into something productive for the blog.  

We have had this huge pile of wood sitting outside of our house since July.  A lot of it is wood we picked up from my in-law's house, the pallets were delivered to our house by a friendly neighbor, and then there are just lots of scraps of wood from some remodeling we've been working on.  Hmmmm, what could I do with all this wood???  PUMPKINS!


This project was so easy.  I went through our huge pile of wood...


and found a few random pieces that I thought would make cute pumpkins.  I also I had my sweet hubby cut a few little pieces for the stems. 


Then came the painting.  I had a few little helpers for this part.  For their pumpkins, they painted then entirely orange.  For my pumpkins, I did the first coat white.  When that coat was dry, I painted an orange coat on top of the white.  For the stem pieces, I simply painted them green.

When everything was nice and dry, I distressed the wood with a piece of sand paper.  If you don't like that look then just omit this step.  Next, using my glue gun, I glued a piece of thin wire, which I curled, and the green "stem" to the top of the pumpkin.  I think they turned out pretty cute.  When I finally dig my harvest decorations out of the attic, I will decorate with leaves but for now, these will simply sit on my mantle as they are.  They brighten up my living room....I LOVE them!


I never feel like my posts are complete until I share with you a favorite recipe.  Today, I thought I would share with you a recipe my sister-in-law, Micky, gave me.  Gingersnap Pumpkin Pudding.  I have seen several recipes similar to this one but I have not liked any of them as much as I do this recipe.  It is always a hit when I have it at parties.  I use it mainly as a dip for gingersnaps or fruit although I am positive you could eat it by itself.  It is absolutely delicious.  We have it several times during the fall.  If you love all things pumpkin, you must try this gingersnap pumpkin pudding!


GINGERSNAP PUMPKIN PUDDING

Ingredients:
* 1 3/4 cup cold milk
* 1 package instant cheesecake or vanilla pudding mix (the small box)
* 1/2 cup canned pumpkin
* 1/4 to 1/2 teaspoon pumpkin pie spice
* 3 gingersnaps, crushed
* 1 cup whipped topping

Directions;

In a large bowl, whisk milk and pudding mix together for 2 minutes.  (I use my electric mixer for this part).  Stir in the canned pumpkin and the pumpkin pie spice.  Let stand for a few minutes or until soft-set.  Fold whipped topping into pudding.  Sprinkle the crushed gingersnaps on the top. 

There you have it folks.  Have a great rest of your week!

Sara Jane

Wednesday, August 29, 2012

Sara Jane: Eating from the Garden

Hi everyone!  I hope you are all having a fabulous week so far.  

While I was out weeding my herb/salad garden this week, I noticed I had some beets that  needed to be picked.  They were huge.  Probably the biggest beets I have ever seen.  Down the row, I also saw some beautiful lemon cucumbers that were ready.  Two of my favorite garden foods.  What to make???


My SIL introduced me to this little piece of heaven a few years ago and now we have it all the time.  During the summer, you will ALWAYS find a few logs of goat cheese in my refrigerator JUST for this salad.  It is delicious!

Ingredients:

*2 large (or three medium) beets, peeled, cubed, cooked and cooled (I cut mine into 1-inch cubes, boiled for about 15 minutes or until I could stick a fork in it easily and then cooled in an ice bath.)
*1/2 small red onion, thinly sliced
*2 regular cucumbers (or 5 lemon cucumbers), peeled and cubed
*Goat Cheese (since we like Goat Cheese a lot, I would use 3 ounces per salad.  Use as much or as little as YOU like)
* 1/4 cup Rice Vinegar

Directions:

In a large bowl, toss together the cucumbers, beets and red onion.  Splash the vinegar on top (again...if you want more, use more; if you want less, use less).  Break your goat cheese into small pieces and distribute throughout the salad. Finish with salt and pepper.

After making this yummy salad, I decided to make a sandwich to go with it to.  In my refrigerator, I had a huge bag of basil from our local CSA.  Pesto!  I have never made pesto before but I know I love it.  One of our local bakeries makes a delicious walnut pesto so that is what I tried to make.  I looked through a bunch of recipies on line but nothing caught my eye so I decided just to go for it and experiment.  Here is what I did.

Pesto

Ingredients:

*1 1/2 to 2 cups basil leaves
*2 T minced garlic
*1/2 cup shredded mozzarella cheese (Not a traditional item but it was the only cheese I had :)
*1/2 cup walnuts
*1/2 t salt
*1/2 to 3/4 cup olive oil

Directions:

I crammed as much basil into my little Cuisinart Food Processor as possible, dumped in the garlic, shoved in the cheese and walnuts and somehow managed to get the top on.  Once I turned on the food processor, I drizzled the olive oil through the top opening.  It seems like you are using a lot of oil but it doesn't actually come out to that much.  Keep adding oil until it is to a consistency that you like.  I like my pesto with a little crunch so I don't do it as fine as others.  

If you have made too much pesto and need to do something with it, try freezing it.  Instructions here.

Okay, so my pesto is done.  The rest is simple.  

My favorite sandwich at one of our local grocery stores, Harvest Fresh, is a turkey sandwich with pesto and sprouts.  I didn't have any sprouts on hand but I did have some left over cucumber that I thought would give the sandwich the perfect crunch.  Here is how I assembled my favorite sandwich.

Two slices of your favorite bread (mind is a honey wheat bread).  Pesto on one slice of the bread, mayonnaise on the other slice.  I grabbed some butter crunch lettuce from the garden, added a few turkey slices, then added my cucumber, a few slices of red onion (from my previous salad), slap it all together and you get this...


I have to say, this sandwich was so fresh and tasty.  Even my husband, who is not a huge turkey fan, really enjoyed it.


Finally, I couldn't leave this post without telling everyone how excited I am for Allison and her sweet little Norah.  Whenever anyone I love has just had a baby, I am slightly jealous of them only because I know how wonderful those first few days can be with a sweet little newborn (I do, however, know, first hand, how hard they can be so I am not too jealous :).  Beatrix was by far my snuggliest baby (and she still is) and I LOVED every minute of it so I hope you (Allison) are getting some restful snuggle time in with your sweet new one.

I thought I would share with all of you how to make my favorite little girl head bands.  With Penelope, I didn't really use a lot of stuff in her hair.  I'm not really sure why but it just wasn't my style then.  With Beatrix, however, I went all out.  I had a hard time finding headbands for her little head though so I decided to try and make them.

I had some wonderful pictures to show you all, step by step, how to do this but I have misplaced my card reader (in the last 10 minutes) and cannot figure out where it is.  If I ever find it, I will post the pictures.

All you need to do to make the greatest headbands ever is first to find a cute elastic (I found some at Joann's).  After you have your elastic, measure the babies head and subtract about 1/2 to 1 inch from that total (depending on how tight you want it to be....don't make it too tight, please....I hate seeing lines on babies heads from where their headbands were too tight).  Cut your elastic to the number you have figured out.  Using a hot glue gun, glue the ends of the elastic together.  It is seriously as simple as that.  I have received so many compliments on my girl's head bands.  They are also perfect because you can clip flowers or bows directly on the headband instead of the hair (just in case your cutie pie baby doesn't have hair).  My older daughter uses Bea's headbands still when she has her hair up in a pony.

I have another headband trick I wanted to show you but I'm afraid I'll have to wait until I find that stinkin' card reader.  (It is just one that I can't really explain without pictures).  Oh, I thought you might also like to know that Beatrix has misplaced my keys as well.  As soon as I get off this computer, we are going to have a search party for the keys.  Sometimes all you can do is laugh!

I hope you all have a wonderful week.

Sara Jane


Wednesday, August 15, 2012

Sara Jane: Summer Quesadillas

It has become a tradition, on both my side of the family and my husband's side of the family, to have our annual family reunions during the summer on the Oregon Coast.  This past week, we went to the coast for my in-law's family reunion.  It was the perfect vacation.  We built sand castles, played in the freezing ocean water, went to the touching ponds, watched a meteor shower and ate delicious food.

Penelope touching a giant sea cucumber (slug) and star fish at the Hatfield Marine Science Center.

Uncle Doug helping Ash in the touching pond.
 While on the family reunion, we each take an evening to make dinner.  For my dinner, I made hominy curry (since we have several vegetarians in the family). It was fantastic!  I'm not sharing that recipe yet but I will.  Instead I am sharing my SIL, Olivia's recipe.  She made the most delicious quesadillas with sweet potatoes, goat cheese and chard (I know at least one sister is gagging at this point).  I don't usually like sweet potatoes and never like chart but LOVED this meal.  In fact, I made it again last night only I used kale instead of chard because that's what came in our CSA.

Here we go...


SUMMER QUESADILLAS

Ingredients:

2 purple onions, thinly sliced
2 sweet potatoes
1 T garlic
4 ounces soft goat cheese, at room temperature
1 package tortillas (I used the ready-to-cook kind you can buy at Walmart), cooked
1 bunch of kale, chopped (any green will work)

Directions:

Slice your sweet potatoes into 1-inch thick medallions.  Place on a baking sheet and bake at 300* for 30 - 45 minutes, until soft enough to smash.  They should look something like this when they're done...


Cook your sliced onions in a tablespoon of olive oil in a large skillet over medium heat until the onions are soft and translucent (about 10 to 15 minutes).

When your onions are ready, add another tablespoon (or 2) of oil and add in your kale.  If it looks like a lot, don't worry.  It will cook down.  Add a few tablespoons of water and cover with a tight fitting lid.  Occasionally stir.  Cook for about 5 - 10 minutes.  It should look something like this when its done...


Take the potatoes out of the oven, peel off the skins and smash, like you would regular mashed potatoes.

Cook your tortillas.

When tortillas are finished, spread goat cheese over one side of two tortillas.  Next, on one tortilla, spread a thin layer of sweet potatoes over your goat cheese.  Then add a generous helping of the kale/onion mix on top of the sweet potatoes.  Finally, add the second tortilla, goat cheese side down, on to the top.

Slice with a pizza slicer and serve warm.


Enjoy!