Showing posts with label felt. Show all posts

Wednesday, October 31, 2012

Allison: Tutu's and Superheros

Hello, again and Happy Halloween! I've been having so much fun preparing my kids' costumes this year. For Isla's first two Halloweens, Old Navy did all the work. But I really wanted to make something special for my girls this year. I grew up with an amazing mother that always made our costumes, and I'd love to carry on that tradition.

My older daughter has been completely obsessed with Tinker Bell for awhile now, so this costume was a given. I'd seen multiple tutu tutorials on Pinterest, and thought I'd give it a try.  I love the tutu that Sara shared on this post.  I followed the tutorial found here and only made a couple of adjustments. I used my ruler and mat to make the cutting of the strips a little easier. Tulle can be hard to work with, but this method made it more manageable.


I also alternated colors to add more dimension. I definitely recommend putting the elastic or ribbon on the back of a chair while you tie the tulle. This was very helpful and made the work go pretty quick.  Just be careful not to stretch the elastic too much, or you'll end up having to cut it down.  Overall, I love how it turned out!


To finish off her costume, I made two small tulle puffs to tie to her shoes, and bought a pair of white wings. The hardest part of the project was finding a green shirt to match. After looking at multiple stores, I decided I'd have to dye a shirt myself. I had never used RIT dye, but figured it wouldn't be too hard to figure out.  Once I discovered this site, it was a piece of cake, and came out the perfect color.

She looks a little dazed, but you get the idea.  :)

For Norah's costume, I kind of cheated.  I saw something about Wonder Woman on Pinterest, and sifted through a bin of baby clothes a friend of mine had given to us.  After finding something that would work, it only took a few sewed lines, and some felt to turn my baby into a superhero.  I am in love with the final result and had a lot of fun putting it together.  She was pretty much a hit at our church Halloween party.  :)


Wonder Norah!

I realize that today is Halloween, and these "ideas" don't really help you now.  But I figured tutu's and costumes are fun to play in all year round.  I hope you all have a safe and fun Halloween!


Allison

Tuesday, October 16, 2012

Sara Jane: Felt Pumpkin Bags

***Giveaway is now closed***

Have I told you how amazing my/our mother is?  Well, she is.  She always has been, too.  She was the mom who was always volunteering in the classroom.  She would give demonstrations at school on how to make bread or sew an apron.  She made (back when you could take homemade treats) birthday treats for the class when our birthdays came around (keep in mind she had 7 children).  She was very involved in PTA (her fundraisers funded the new playground when I was in elementary school).  She was/is amazing!

One of the fun things I remember her doing for at least a few of my school classes were pumpkin bags for Halloween.  She would spend hours cutting and sewing the bags and then stuff the cute bags with little treats and plastic spiders.  

A few years ago, I came across one of my pumpkin bags from my childhood.  At this time, Penelope was just beginning to understand how fun Halloween and other holidays were.  I made a pattern off of the bag, made 10 bags, and then Penelope and I took them to her favorite people (I think one actually made it back to my mom).  We had so much fun doing it that it has now become a tradition in my family and I hope to someday get to take a tray of them to my children's classes.

With special permission from my mother, I am going to share these bags with you.  Here we go...


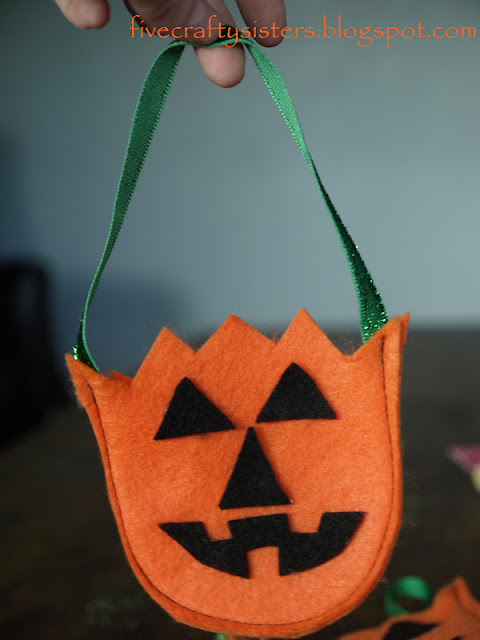
First, you will need black and orange felt and ribbon for the handle.  My mom always used green ribbon so that is what I have used. First, cut out a pumpkin, a mouth, a nose and two eyes.  For the nose and eyes, I just cut random triangles so each pumpkin was different.  If you would like a copy of the template I used for the pumpkin and the mouth, either leave your email in a comment or email me at fivecraftysisters@gmail.com and I would be happy to send one to you.  I could not get the template uploaded.  Next, using your hot glue gun, glue on the eyes, nose and mouth making sure to leave enough room for a seam.


Next, you sew the pumpkin together, making a bag.  A few things to remember: (1) be sure to add the ribbon into the first few stitches, (2) make sure to back stitch the beginning and end and (3) make sure to keep the top open - You may be thinking "duh"...I've sewed the top shut before :)

I had quite a difficult time sewing these little guys this time around.  My thread kept breaking, my needle broke....needless to say, these bags are in no way perfect but I am sure the children who receive them will still love them.  I tried hot gluing the pumpkin pieces together and it worked really well.  I just like the look of the black thread on the orange felt :)


When you are finished sewing, this is what your bag should look like.


We like to fill ours with our favorite candy and I always add, just like my mom did, a plastic spider ring.  This year, we are also adding Dracula teeth.  


Penelope can't wait to hand out her favorite little goody bags.  


Now for the giveaway that I promised back here...

I will be giving away TEN pumpkin bags to one lucky reader (treats not included). 

All you have to do to be in the running to receive these is leave a comment on what your favorite holiday tradition is in your family.  This giveaway will close at 12:00 AM on Saturday morning.  That way I can mail the bags to you in time for Halloween.


 I hope you guys enjoy these bags as much as we do around here.

Sara Jane

Wednesday, September 26, 2012

Sara Jane: DIY Gifts

I am one of those annoying people who has 99% of their Christmassing (yes, that is a word in my home) done December 1st EVERY year.  I do if for two reasons: (1)  I LOVE the entire process of buying/making gifts and then giving them to others and (2) So I can really enjoy the entire month of December and focus on the family traditions that we have created within our own little family.

During the year, when I am out shopping, I am constantly thinking of who would like what.  Two years ago, I had my children's entire Christmas done in January (there was a fantastic sale I could not pass up).  This year, however, I have been slacking soooooo, I thought I would share with you some of the projects I have recently started working on for Christmas.  I love doing homemade gifts, especially for my children, so I can personalize the gift for the person who will be receiving.  Here are a few that I've started....

1.  Car Caddy
2.  Doll with carrying case
3.  Mini Coloring Tote
4.  Magnetic Scrabble Board
5.  Little man ties
6. Sticky Grams (such a cute idea for grandparents!)

I just finished one super simple gift this weekend and wanted to share it with you.

I went to our local Habitat for Humanity ReStore this weekend looking for materials that would inspire me to do something crafty.  This store is one of my favorites!  Not only do they serve a pretty incredible purpose but they have random parts and pieces that you can't find anywhere else.  We got our beautiful claw foot bathtub at our ReStore for a steal!

Anyway....while there, I discovered their tile section.  After holding a tile for probably 3 or 4 minutes, I remembered seeing a coaster somewhere that a person had made from a tile and some modge podge.  Perfect!  I grabbed a few tiles (only $0.10 each!) and headed home.

For this coaster project, you will need, tiles (however many you want to make), mod podge (mine is homemade - Just a 50/50 mixture of Elmer's glue and water), decorative paper, felt, a clear high-gloss spray paint (not pictured), and a hot glue gun.


First, cut your paper so that the paper squares are just slightly smaller than your tile.  Next, paint your tile with a thin layer of mod podge.  Place your decorative paper on top of the tile/mod podge.  Paint another layer of mod podge over the decorative paper.  Allow to completely dry (I had them dry over night) .  Finally, spray a coat of clear high-gloss spray paint on top.  To finish off the coaster, cut out felt squares to line the entire bottom of the tile (I simply traced the tile onto the felt) and glue them on with the hot glue gun.  So simple and they turned out really cute.


There are so many ways that you could personalize these coasters.  I will be making some for a certain family member that will have pictures on top of the decorative paper.  Another fun thing you could do is to first paint the tile and then add paper/pictures.  Or, how about adding stickers to say something fun.  The possibilities really are endless.

Until next week...

Sara Jane

Friday, May 4, 2012

Shauna: The Garden Apron


I love all the post from my sisters! They are such wonderful mothers.  I've been so blessed to have not only a wonderful mother, but a loving mother-in-law.  Both of these woman have been such a blessing to me as a young mother, and incredible grandmothers to our boys.  I could not ask for better examples of faith, strength, patience, kindness and love.  I love these woman so much!! It just happens that both of these woman like gardening, so I decided to make them garden aprons, and this is how I did it.


The Garden Apron Tutorial...