Showing posts with label present. Show all posts

Tuesday, October 16, 2012

Sara Jane: Felt Pumpkin Bags

***Giveaway is now closed***

Have I told you how amazing my/our mother is?  Well, she is.  She always has been, too.  She was the mom who was always volunteering in the classroom.  She would give demonstrations at school on how to make bread or sew an apron.  She made (back when you could take homemade treats) birthday treats for the class when our birthdays came around (keep in mind she had 7 children).  She was very involved in PTA (her fundraisers funded the new playground when I was in elementary school).  She was/is amazing!

One of the fun things I remember her doing for at least a few of my school classes were pumpkin bags for Halloween.  She would spend hours cutting and sewing the bags and then stuff the cute bags with little treats and plastic spiders.  

A few years ago, I came across one of my pumpkin bags from my childhood.  At this time, Penelope was just beginning to understand how fun Halloween and other holidays were.  I made a pattern off of the bag, made 10 bags, and then Penelope and I took them to her favorite people (I think one actually made it back to my mom).  We had so much fun doing it that it has now become a tradition in my family and I hope to someday get to take a tray of them to my children's classes.

With special permission from my mother, I am going to share these bags with you.  Here we go...


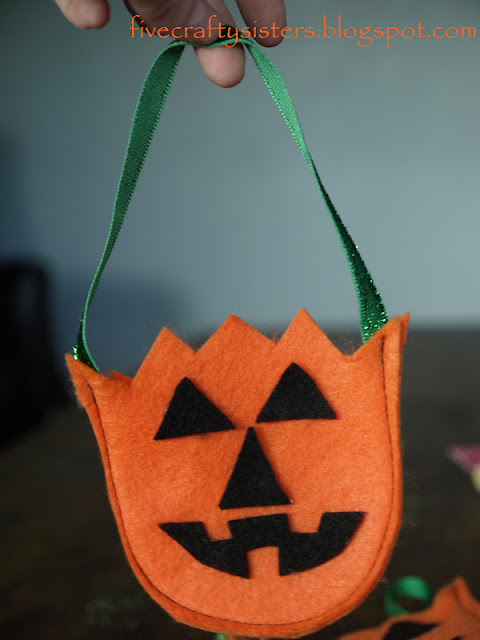
First, you will need black and orange felt and ribbon for the handle.  My mom always used green ribbon so that is what I have used. First, cut out a pumpkin, a mouth, a nose and two eyes.  For the nose and eyes, I just cut random triangles so each pumpkin was different.  If you would like a copy of the template I used for the pumpkin and the mouth, either leave your email in a comment or email me at fivecraftysisters@gmail.com and I would be happy to send one to you.  I could not get the template uploaded.  Next, using your hot glue gun, glue on the eyes, nose and mouth making sure to leave enough room for a seam.


Next, you sew the pumpkin together, making a bag.  A few things to remember: (1) be sure to add the ribbon into the first few stitches, (2) make sure to back stitch the beginning and end and (3) make sure to keep the top open - You may be thinking "duh"...I've sewed the top shut before :)

I had quite a difficult time sewing these little guys this time around.  My thread kept breaking, my needle broke....needless to say, these bags are in no way perfect but I am sure the children who receive them will still love them.  I tried hot gluing the pumpkin pieces together and it worked really well.  I just like the look of the black thread on the orange felt :)


When you are finished sewing, this is what your bag should look like.


We like to fill ours with our favorite candy and I always add, just like my mom did, a plastic spider ring.  This year, we are also adding Dracula teeth.  


Penelope can't wait to hand out her favorite little goody bags.  


Now for the giveaway that I promised back here...

I will be giving away TEN pumpkin bags to one lucky reader (treats not included). 

All you have to do to be in the running to receive these is leave a comment on what your favorite holiday tradition is in your family.  This giveaway will close at 12:00 AM on Saturday morning.  That way I can mail the bags to you in time for Halloween.


 I hope you guys enjoy these bags as much as we do around here.

Sara Jane

Tuesday, September 18, 2012

Sara Jane: Spray Paint

A few years back, I discovered spray paint and all the fun, amazing, creative ways that you can use it.  My last spray paint project was our TV stand.  It is BRIGHT yellow and so very pleasant in our family room.  I haven't used spray paint in quite a while though so I decided today would be a good day to get reacquainted with my old friend.

For this project, I went to our local Goodwill store and found these three great pieces:  two tins (each $0.99) and one ceramic rooster ($1.99).  Then I headed to Joann's (which happens to be next door) and picked out a few colors that I liked.  If you don't want to spend oodles of money on spray paint, Walmart has cans for only $0.99!  Its not the most quality spray but it works fine.

Anyway, here are the three pieces I bought today:


First up was the rooster.  I have a special place in my heart for roosters.  Last year, we bought four chickens.  My chicken's name was Mrs. Pettitoes.  She was absolutely beautiful but one Sunday, when we came home from church, she was crowing at our back door and we realized that Mrs. Pettitoes was actually a MR. Pettitoes.  I was sad....

Anyway, I love roosters.

For my rooster, I wanted him to be a deep red.  To start, I sprayed my first coat and let it dry for about 15 minutes.  Then I sprayed another one.  Remember to use short, even sprays for the most even color.  After that coat, I only had to do a few touch up sprays in little cracks and here is how he turned out...


We don't have a permanent home for him yet but I am hopeful that he will have a nice place in my kitchen one day soon.

Next up were my tins.  I have seen spray painted tins all over Pinterest lately so I thought I would give it a try.  Well, the first tin (the one with the handle in the picture above) didn't turn out so well.  Since it is rather hideous (very gloppy and runny), it is now a small trash pail in the backyard for the kids.  The second time, I remembered to slow down and take my time (something I am constantly reminding myself of).  This one turned out perfectly!  For this tin, I sprayed very small areas to start. It took me about three coats and about 30 minutes to get it just right.  It turned out the perfect color and really transformed the tin.


I will definitely be spraying more tins around the holidays to use as the wrapping for gifts.  I love how they look!

Since I had this beautiful tin, I decided that today was a good day to do the cookie of the month for my father-in-law.  I tried out something new and loved how it turned out.

Using my favorite pie crust recipe, I made little cookies (simply make the dough and shape it how you like, sprinkle cinnamon sugar on the top then bake them at 450* for about 7 minutes or until lightly browned).

While I could eat pie crust all day long, I know not everyone likes it so I put a small jar of some pear jam my husband just made in the middle.  We had to test everything out before we gave them away and let me tell you, they were scrumptious!  It tastes exactly like you are eating a bite of pear pie.


I have decided that I will one day soon make an entire platter of these pie crust cookies and then put out all my favorite jams - blackberry, strawberry, pear, peach- and just eat pie all day.  Yummmm!

Happy crafting, my friends!

Sara Jane

Tuesday, June 5, 2012

Allison: Cookie of the Month Club

Not bad, Lisa!!  Your man is pretty great.   He's helped me out many times.  I'll vouch for him.  :)

Happy Father's Day Week, everyone!  I'm so excited to celebrate (aka gush about) the amazing fathers in my life!  I was blessed with an outstanding father.  I have turned to him countless times when I've needed words of wisdom or a voice of reason.  He is the greatest man I know and I love him very much.

Having this kind of father, raised the bar pretty high when looking for the future father of my children.  It took me awhile longer than most of my sisters, but I did it!  My husband is the most amazing example to me of kindness, compassion and unconditional love.  He can look at me when I'm sleep deprived, unshowered and irritable and tell me how beautiful I am (with a straight face).  I feel incredibly lucky and so blessed to have him as my eternal partner.

Not only is Brent the best husband in the world, he's also the most amazing father to our little "I".  She LOVES spending time with him, and literally paces the floor until he comes home to play with her each evening.  She trusts him like every little girl should trust her daddy.  The love I see in her eyes for her father, is only matched by Brent's love for his little girl.

I could go on and on, but I'll stop now.  Because I'm still tweaking Brent's gift, I thought I'd share the idea I came up with to honor my father.  I know that I don't express my appreciation enough to him for all that he's done/does for me.  So I found a gift that will keep expressing that gratitude each month this year.  My dad has now been enrolled in "Grandpa's Cookie of the Month" club!!  My idea is to send a dozen cookies each month to his office, along with a note from his granddaughter expressing our love for him.  For this first month, "I" and I are sending him my much loved butterscotch, oatmeal and peanut butter cookies.  The official name of this cookie in the Better Homes and Gardens' cookbook is Peanut Butter-Oatmeal Rounds.  But I have put my own twist on this cookie and renamed them Scotchers.  I've tweaked the recipe a bit too.  Here it is:


I promise... these are amazing!  I look forward to trying new recipes as I run out of my go-to's.  Along with the cookies, I'll send this fun little label with a picture of "I" and a note on the back.  


You can download the Grandpa label here.   I also made an option for a Dad's Cookie of the Month label that you can download and print here.  Sorry about the shadow under the label.  PowerPoint and I are still figuring out how to be friends.  I just cut it off.  Problem solved.  :)
                                      

Everyone have a great week, and enjoy spoiling the men in your life!  


Allison


Tuesday, May 8, 2012

Allison: Banana Bread and More

What a fun week full of Mother's Day ideas!  For this week's theme of "Teacher Appreciation", I'm taking it from a different vantage point.  I taught a fifth-grade class for two years before we started our family.  I've been the teacher being appreciated, and it's so fun!  I'm not going to lie.  Besides motherhood, teaching is one of the hardest things I've ever tackled.  Teachers put so much time, energy and love into every day.  I got completely spoiled by my students and their parents on a regular basis.  Those little (and sometimes big) gestures made my day and often made all the hard work a little easier, knowing someone was aware of my efforts.

That being said, I have a couple of ideas to make your child's teacher feel the appreciation that you feel for them and their daily efforts.  First off, I think it's important to remember that not every gesture of appreciation has to be time-consuming or expensive.  It doesn't even have to be given on a day that every other student will be honoring their teacher.  If your child is having a particularly tough week at school, chances are their teacher is also feeling the strain (times 30).  The times when I felt most special were usually those occasions when I received a little something completely out of the blue, for no reason.  I have multiple memories of a sweet note and little treat left quietly on my desk.  Those always made me smile.

With that in mind, I thought I'd share my favorite banana bread recipe that is sure to add a sweet surprise to any teacher's day.  I originally found the recipe here, on allrecipe.com.  Of course I made changes (which I do to most recipes I find there).  The modified ingredients are in bold print:

  • 1/2 cup butter melted
  • 1/3 cup white sugar
  • 1/3 cup brown sugar
  • 2 eggs
  • 1 teaspoon vanilla extract
  • 1 1/2 cups all-purpose flour
  • 1 teaspoon baking soda
  • 1/2 teaspoon salt
  • 1 cup sour cream
  • 1/2 cup chopped walnuts (I don't add walnuts, because they're gross)
  • 2 medium bananas, mashed

I found that reducing the sugar didn't change the sweetness too much, and adding sour cream just made them even more moist (my husband HATES that word).  And just as I'm a lazy crafter, I'm also a lazy baker. Who can wait 60 minutes for banana bread to get out of the oven??  I can't.  Instead I make this recipe into muffins, baking them for 23-25 minutes (yielding between 12 and 15 muffins).  I LOVE banana bread, and this recipe makes even me feel like a good baker.  Plus, it's passed the 18-month-old challenge because "I" loves them too.

As a teacher, I loved receiving gifts that could become part of my classroom decor.  I've seen these crayon monograms before, and would have loved to have had one in my classroom.  I found this one here.  I think they're so fun, and don't look too hard to make.

Next, I loved gifts that were not only personal, but useful.  I read everyday to my students and loved when my students would make me bookmarks.  I thought this bookmark from one of my favorite blogs, In Between Laundry, would be fun and easy for your children to make.  Besides, wouldn't we rather that they do the work for THEIR teacher??

This last idea might work better for a birthday, but I still had to include it because it's so stinking cute.  As a teacher, I spent a lot of my own money on things for my classroom.  I love this school supply cake!  It's fun and would be a great way to add to your child's classroom supply.

Well, there you have it.  No crafting from me this week, but I will take a second to show off another project that got finished this weekend.  This blog has really inspired me to finish a few projects that have been sitting in my craft space, collecting dust.  I started this quilt when I was still pregnant with my daughter, and just finished it.  Ridiculous!  It was a lot of work.

I'm really happy with how it turned out, and now just need to figure out what to do with it.  Heaven forbid I keep one of my own quilts.  Hope everyone has a great week and don't forget to make sure those teachers in your life feel appreciated!


Allison

Friday, May 4, 2012

Shauna: The Garden Apron


I love all the post from my sisters! They are such wonderful mothers.  I've been so blessed to have not only a wonderful mother, but a loving mother-in-law.  Both of these woman have been such a blessing to me as a young mother, and incredible grandmothers to our boys.  I could not ask for better examples of faith, strength, patience, kindness and love.  I love these woman so much!! It just happens that both of these woman like gardening, so I decided to make them garden aprons, and this is how I did it.


The Garden Apron Tutorial...