Showing posts with label tutorial. Show all posts

Tuesday, October 16, 2012

Sara Jane: Felt Pumpkin Bags

***Giveaway is now closed***

Have I told you how amazing my/our mother is?  Well, she is.  She always has been, too.  She was the mom who was always volunteering in the classroom.  She would give demonstrations at school on how to make bread or sew an apron.  She made (back when you could take homemade treats) birthday treats for the class when our birthdays came around (keep in mind she had 7 children).  She was very involved in PTA (her fundraisers funded the new playground when I was in elementary school).  She was/is amazing!

One of the fun things I remember her doing for at least a few of my school classes were pumpkin bags for Halloween.  She would spend hours cutting and sewing the bags and then stuff the cute bags with little treats and plastic spiders.  

A few years ago, I came across one of my pumpkin bags from my childhood.  At this time, Penelope was just beginning to understand how fun Halloween and other holidays were.  I made a pattern off of the bag, made 10 bags, and then Penelope and I took them to her favorite people (I think one actually made it back to my mom).  We had so much fun doing it that it has now become a tradition in my family and I hope to someday get to take a tray of them to my children's classes.

With special permission from my mother, I am going to share these bags with you.  Here we go...


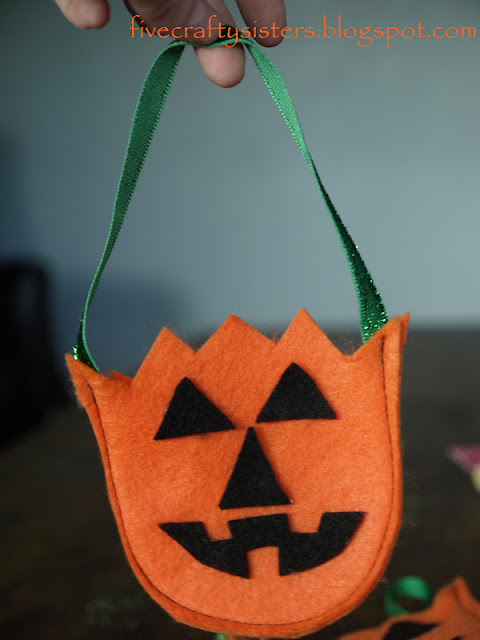
First, you will need black and orange felt and ribbon for the handle.  My mom always used green ribbon so that is what I have used. First, cut out a pumpkin, a mouth, a nose and two eyes.  For the nose and eyes, I just cut random triangles so each pumpkin was different.  If you would like a copy of the template I used for the pumpkin and the mouth, either leave your email in a comment or email me at fivecraftysisters@gmail.com and I would be happy to send one to you.  I could not get the template uploaded.  Next, using your hot glue gun, glue on the eyes, nose and mouth making sure to leave enough room for a seam.


Next, you sew the pumpkin together, making a bag.  A few things to remember: (1) be sure to add the ribbon into the first few stitches, (2) make sure to back stitch the beginning and end and (3) make sure to keep the top open - You may be thinking "duh"...I've sewed the top shut before :)

I had quite a difficult time sewing these little guys this time around.  My thread kept breaking, my needle broke....needless to say, these bags are in no way perfect but I am sure the children who receive them will still love them.  I tried hot gluing the pumpkin pieces together and it worked really well.  I just like the look of the black thread on the orange felt :)


When you are finished sewing, this is what your bag should look like.


We like to fill ours with our favorite candy and I always add, just like my mom did, a plastic spider ring.  This year, we are also adding Dracula teeth.  


Penelope can't wait to hand out her favorite little goody bags.  


Now for the giveaway that I promised back here...

I will be giving away TEN pumpkin bags to one lucky reader (treats not included). 

All you have to do to be in the running to receive these is leave a comment on what your favorite holiday tradition is in your family.  This giveaway will close at 12:00 AM on Saturday morning.  That way I can mail the bags to you in time for Halloween.


 I hope you guys enjoy these bags as much as we do around here.

Sara Jane

Wednesday, September 26, 2012

Sara Jane: DIY Gifts

I am one of those annoying people who has 99% of their Christmassing (yes, that is a word in my home) done December 1st EVERY year.  I do if for two reasons: (1)  I LOVE the entire process of buying/making gifts and then giving them to others and (2) So I can really enjoy the entire month of December and focus on the family traditions that we have created within our own little family.

During the year, when I am out shopping, I am constantly thinking of who would like what.  Two years ago, I had my children's entire Christmas done in January (there was a fantastic sale I could not pass up).  This year, however, I have been slacking soooooo, I thought I would share with you some of the projects I have recently started working on for Christmas.  I love doing homemade gifts, especially for my children, so I can personalize the gift for the person who will be receiving.  Here are a few that I've started....

1.  Car Caddy
2.  Doll with carrying case
3.  Mini Coloring Tote
4.  Magnetic Scrabble Board
5.  Little man ties
6. Sticky Grams (such a cute idea for grandparents!)

I just finished one super simple gift this weekend and wanted to share it with you.

I went to our local Habitat for Humanity ReStore this weekend looking for materials that would inspire me to do something crafty.  This store is one of my favorites!  Not only do they serve a pretty incredible purpose but they have random parts and pieces that you can't find anywhere else.  We got our beautiful claw foot bathtub at our ReStore for a steal!

Anyway....while there, I discovered their tile section.  After holding a tile for probably 3 or 4 minutes, I remembered seeing a coaster somewhere that a person had made from a tile and some modge podge.  Perfect!  I grabbed a few tiles (only $0.10 each!) and headed home.

For this coaster project, you will need, tiles (however many you want to make), mod podge (mine is homemade - Just a 50/50 mixture of Elmer's glue and water), decorative paper, felt, a clear high-gloss spray paint (not pictured), and a hot glue gun.


First, cut your paper so that the paper squares are just slightly smaller than your tile.  Next, paint your tile with a thin layer of mod podge.  Place your decorative paper on top of the tile/mod podge.  Paint another layer of mod podge over the decorative paper.  Allow to completely dry (I had them dry over night) .  Finally, spray a coat of clear high-gloss spray paint on top.  To finish off the coaster, cut out felt squares to line the entire bottom of the tile (I simply traced the tile onto the felt) and glue them on with the hot glue gun.  So simple and they turned out really cute.


There are so many ways that you could personalize these coasters.  I will be making some for a certain family member that will have pictures on top of the decorative paper.  Another fun thing you could do is to first paint the tile and then add paper/pictures.  Or, how about adding stickers to say something fun.  The possibilities really are endless.

Until next week...

Sara Jane

Tuesday, July 3, 2012

Allison: Frame Revamp Tutorial

Hello, and welcome to another week!  I'm not sure where last week went.  I cannot believe how this summer is flying!  That being said, we know that summer is a busy time, and our lives are no exception.  With vacations and kids and babies coming, we're going to try to keep our weekly themes a little more general to just "Summer" for a few weeks.  This may mean less consistency between the sisters' posts, but it also means more variety.  Hopefully we'll get some guest bloggers to contribute along the way.  I can't wait to see what my sisters come up with!

I think my posts will follow the theme of "Summer Projects".  My crafting energy has been greatly consumed lately with getting my house ready for this little girl to arrive next month and nesting is in full force! I have been working on her room, and trying to make Isla's a little more girly in the process.

A couple of months ago, I cross-stitched some cute little bears and added Isla and Norah's names underneath.  I wanted to find the perfect frame for them, but could not find what I was looking for.  So, I decided to take matters into my own hands.  Here's what I did:

I found this black frame at Wal-Mart for $7.  I liked the mat, and I liked the frame, but not their colors.  Isla has more brown in her room than black, so I wanted her frame to be a neutral white.  Also, the mat needed more personality.  Here's what you'll need to revamp your frame:


*Obviously, you will need a frame to revamp.  :)  I wish I could have found a frame at a second-hand store, but I couldn't.  So, I bought this lovely frame, and spray painted it white.

*Mod Podge
*Foam brush for applying Mod Podge
*Scissors
*Tissue paper of choice

Here are the steps:


Step One: Remove the mat from the frame and apply a good amount of Mod Podge to the foam brush to cover the front surface of the mat.  I applied mine in stages.  Make sure to apply enough Mod Podge around the edges.

Step Two: Smooth the paper down, and then wrap the paper around the back of the mat.

Step Three: Puncture the center of the tissue, and cut to the four edges.  You'll need to cut paper in the center down before folding it over the edges of the mat.  Apply Mod Podge to the folded-over paper and glue to the back of the mat.

Step Four: Turn your mat over and smile, because it's SO CUTE!

I love how my frame turned out, and think it PERFECTLY showcases my little ballerina bear.  I can't wait to hang it on Isla's bedroom wall.


If you want your own little bear cross stitch, check out our Etsy Shop.  I'll be providing them made-to-order, with lots of themes to choose from.

http://www.etsy.com/shop/fivecraftysisters

I hope you've enjoyed this frame revamp!  I love being able to make something generic into something that's as special as my little Isla Girl.  Have a great week, and keep on creating!!


Allison


Tuesday, June 26, 2012

Allison: Patriotic Treat and Kids' Craft


I LOVE THE UNITED STATES OF AMERICA!  It's true... I consider myself to be a very patriotic person, and LOVE any holiday that celebrates my country.  I lived in Spain for 18 months as a missionary for my church and didn't realize just how much I loved my country, until I was away from its soil.  Every time I would see an American flag, I would get emotional and instantly homesick.  That being said, I'm excited to share a patriotic-themed dessert/appetizer recipe and kids' craft with all of you today.


I took my inspiration for these cute little cupcakes from here.  I loved the idea of a bite-sized dessert that wouldn't be TOO messy.  They were surprisingly easy to assemble and even easier to snack on in the process (tee hee).  Here's what you'll need:


Duh.  You could probably figure out those ingredients.  But I'm going to share the whipped cream cheese frosting recipe that I discovered, and you are going to thank me (or curse me)!  Of course I found it through Pinterest, on this site , as a cinnamon roll topper.  I may never make another cream cheese frosting again.  It is amazing!  I had to stop myself from sampling it too much, before it was all gone.  This would work great for a standard size cupcake too, but I liked the idea of a bite-sized treat, so I used the mini cupcake tin.  The adorable little pinwheels I found in Target's dollar section, and worked great to secure the stack.  I love them!


Here's the frosting recipe:

Ms. Humble's Whipped Cream Cheese Frosting

16oz cream cheese, room temperature
1 1/2 cup powdered sugar
1 teaspoon vanilla
1 cup heavy cream, cold

Beat the cheese, sugar and vanilla until smooth and fluffy. In a separate bowl, beat the heavy cream to nearly stiff peaks, then add the whipped cream into the cheese mixture and quickly and briefly beat to combine. Do not over beat.


Mmmm... So good...


This patriotic craft came from a cute blog I came across called "Random Thoughts of a Supermom".  This mom is so creative and I loved that she involved her kids in the project.  I planned to replicate her version of this windsock but wouldn't you know it... I got lazy.  So instead, I thought I'd share my version.  Maybe not AS cute, but still a little cute and definitely kid-friendly.

You'll need these things:

* blue plastic cups
* red & white crepe paper
* tape
* star stickers


This little guy was so easy to assemble!  I just taped alternating red and white crepe paper to the inside of the cup, and poked a little hole in the top to string some white ribbon to hang it up.  Next, grab your star stickers and stick them on.  Done!  I didn't think my two-year-old could handle this yet, but I think this craft would be so fun for kids!


The blog I "borrowed" the idea from used empty baby formula canisters and spray painted them blue.  She also used ribbon instead of crepe paper.  Either way, I think they're a great way to decorate the outside of your house for patriotic holidays.  

Before I end this post, I wanted to advertise to our faithful readers and friends the special I'm offering this week on our Etsy page.  I'll be selling my 9" Patriotic Rag-Tie Wreath until the 4th of July for only $10 (instead of the $15 it sells for on Etsy).  Any local orders can be hand-delivered also, saving on shipping.  For any out-of-state orders, I'll give you a discount on shipping (only $3, instead of $5).   Message me or leave a comment and I'll create a posting for you where the discount is applied. 

Get your wreath now!!  :)


Well, I hope you enjoyed my easy dessert and craft!  Even more, I hope you enjoy celebrating our freedom this 4th of July.  May we always remember those that have fought and continue to fight for that freedom.  Happy Independence Day!!


Allison


Tuesday, June 12, 2012

Allison: Car Seat Cooler Tutorial

Hello again!  I love reading about all the fun stuff that Lisa does with her cute family!  It makes me really excited for my little family to do similar things in the future.  That being said, with a twenty-month-old, we don't really go on many outings.  If Costco counts as an outing, then we go on A LOT!

Isla and I spend our days doing pretty basic things: cleaning, shopping, watching Toy Story 3.  That's about it.  But anytime we do venture out of the house, I face the same dilemma:  Arizona heat and a hot car seat.  Luckily, Isla doesn't really seem to mind the heat as much as her pregnant momma does.  Lately I've really wanted to fix the hot car seat problem, but have been pretty lazy about making her one of the really cutesy car seat coolers I've seen on Pinterest.  So I decided to embrace the laziness and make the most basic one I could that would still get the job done.  It took me a total of about 10 minutes and will give her all the relief of an overly-embellished version.

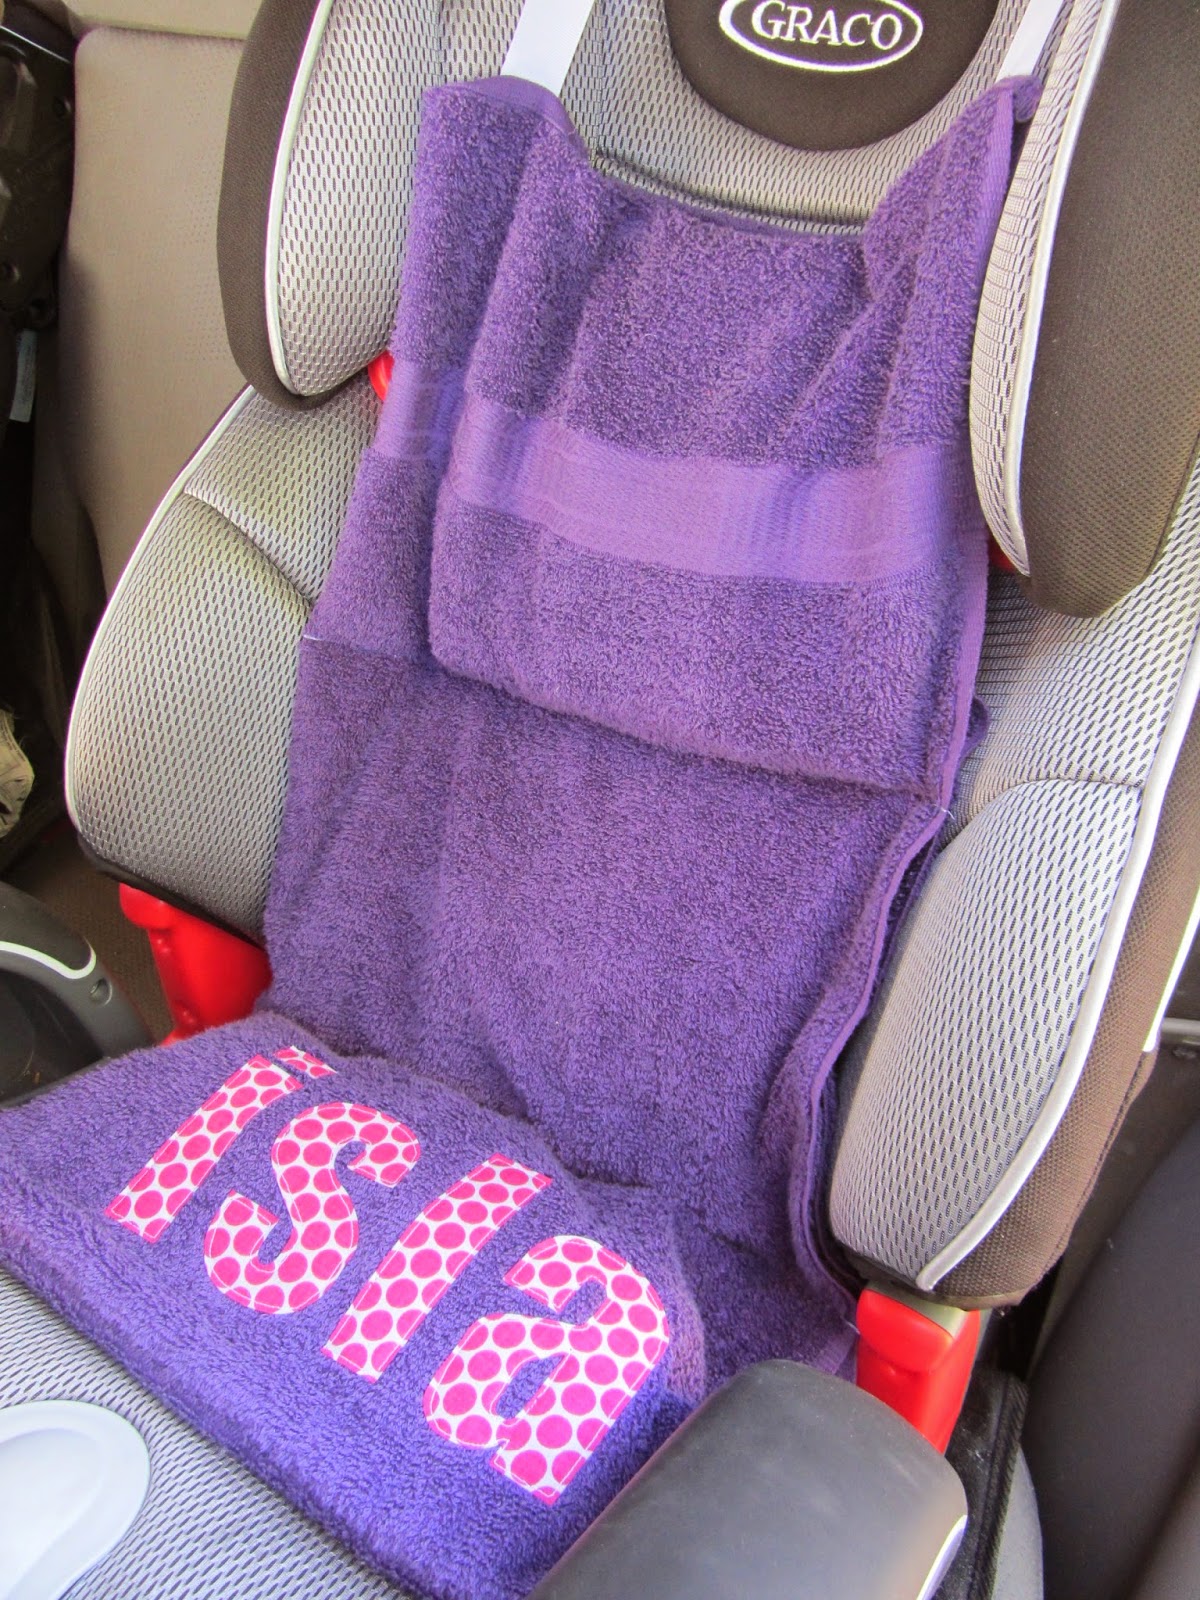
Before I describe the process, I should probably explain a car seat cooler, if you haven't already figured out its purpose.  When you leave the house, you grab the cooler and take it with you.  Once your little one is out of the car seat, you place the cooler in the car seat, tucking the straps with those hot little metal buckles underneath the cooler, and go about your planned activity.  Once you return to the car, you remove the car seat cooler and place your child in the nicely cooled seat.  Genius!  Okay, here's what you'll need to make your own:


The towel I bought was $3 at Walmart.  Can't beat that!  I would have preferred to use smaller packs, but these will still work.  I pictured the colorful little coolers because I thought they were so stinking cute.  Isla was a big fan of them too.  :)  These could also be used in a smaller version.  Here are the four easy steps to make your cooler:


#1- Fold your towel hot-dog style (or the long way), and then cut in half.  Technically this one towel can make two coolers.  Maybe one for mom's seat too.  :)  Next sew the top closed after inserting a ribbon or some kind of strap that will be used to hang the cooler from the headrest.

#2- Sew the opposite end closed.

#3- Measure the length of the towel, and divide by three (or however many packs you plan to use.  Smaller packs may need more "pockets".).  I used a disappearing ink pen for marking.

#4- Sew straight lines the width of the towel to create your pockets and insert your packs.  If you'd like to sew a little strip of Velcro to keep the pockets closed, you may want to do that before you sew the lines across.  I figured it would be hanging and the packs would stay put, so I didn't add any.  And... I'm lazy.

That's it!  Isn't that easy?  I realize it's not the prettiest thing I've ever made, but it'll do.  I've read on different sites that the packs can stay cool for up to 6 hours.  I have also seen others use the gel packs.  I don't want to deal with possible leakage, so I think I'll stick to the plastic packs instead of the gel.

I realize that most of you probably aren't experiencing the kind of heat we are here, but hopefully this tutorial may still be useful in some way.  I know that my little Isla will enjoy the fruits of my lazy labor.  :)  I hope you're all enjoying your outdoor outings and these Summer months!  Have a great week!!

(Don't want to make your own?  I'm now selling them in my Etsy shop.)


****UPDATE- 5/30/14****

It's been almost two years since I wrote this tutorial.  It has had almost 3000 views, and I have heard some feedback from those that have used it.  I have made only slight changes to the coolers I make now (like hiding the seams), and have enjoyed adding a personalized element.  Here's the new cooler I made for my now almost four-year-old:


I've also enjoyed playing around with color combinations with custom orders in my Etsy shop.


Thanks for letting me share!!  :)


Allison


Tuesday, May 29, 2012

Allison: "Gardening" according to Allison

Hello again!  If I can get my drooling under control after seeing Lisa's amazing zucchini bread, I'll start my post.  Okay... I'm good.


As Lisa mentioned, this week we're gardening!!  She also mentioned that my parents have an amazing garden.  I have always loved our backyard, but especially during Spring and Summer.  I have taken many pictures over the years of its beauty, and love the serenity that can be found there.  Since I can remember, we've had a HUGE vegetable garden.  I have many memories of weeding and watching my parents care for this space.  After a few years, they converted a large portion of this area into a flower garden.  I appreciate the time and energy that my parents have put into making their yard a place of beauty.

Courtesy of Melissa Gallo


But like Lisa confessed, I did not get this gardening gene passed on to me either.  I seem to kill everything living that enters my home.  I can look up right now and see a Mother's Day plant that has been struggling for its life near the sink, and fear for the survival of the orchid plant my husband gave me the same day.  It's okay... I accept this flaw about myself.  That being said, I thought my take on this week's theme was a little sneaky, and is probably considered cheating.  So be it.

A few years ago, I found these adorable little fabric flowers online.  I had seen them on multiple sites, but had never seen a tutorial on how to assemble them.  I figured it out, and thought I'd pass that process on to all of you.  The flower pictured is actually from a baby shower I organized last year, and only shows the four-petaled version.  I will be making a flower with five petals.  The process is so easy.  Here is what you'll need:

The basic supplies include: scissors, scrap fabric, marker/pen, yo-yo maker (optional), needle and thread and stuffing (which I forgot in the picture, but is VERY important).

If you'd like to put your flower in a pot (as pictured above), you'll need floral moss, tape and styrofoam (I found all of those at The Dollar Tree), wooden dowels (the size depends on the size flower you make), and a pot (not pictured).


These can be as basic or as complex as you want to make them.  I almost always go for basic.  Here are the steps:


Step #1- Trace 5 circles from one fabric type (for each petal), and 1 circle from a contrasting fabric (for the center of the flower).

Step #2a- If using a yo-yo maker, skip step one and cut around yo-yo maker and begin stitching.  Otherwise, begin a basic basting stitch around the edge of the circle.

Step #2b- This is how your fabric should look after stitching around the edge.

Step #3- Insert enough stuffing to cause a little resistance when thread is pulled tight.  Secure thread by stitching through the center multiple times.  Tie a knot to complete petal.


Step #4- Thread the five petals together by stitching through the middle of each ball.

Step #5- I'm a big fan of the glue gun, so I glued the middle ball to the 5 petals.  It can also be stitched in.  Cover a 1/8" wooden dowel by placing a small amount of glue on the tip, and wrapping floral tape from top to bottom (securing with more hot glue).  Finally, secure the dowel to the flower by gluing the tip and inserting it between two petals.

That's it!  Pretty easy, right?  I've also made larger flowers and used a 1/4" dowel (found these at Joann's).  I love mixing smaller flowers with bigger flowers in the same pot.  So fun!

I hope you've enjoyed my type of gardening.  Can't wait to see what Sara has in store for us tomorrow!  She actually knows how to keep plants alive.  See you next week!!


Allison


Tuesday, May 15, 2012

Allison: Patriotic Wreath Tutorial and Giveaway

  **Giveaway is now closed**
Wreath is available in our Etsy shop: http://www.etsy.com/shop/fivecraftysisters

Hello, again!  I hope everyone had a relaxing Mother's Day!

I'm so excited for this week's theme!  I LOVE Memorial Day!  I consider myself a very patriotic person, and relish any opportunity to be reminded how blessed I am to live in this free country and to celebrate all those who protect/have protected that freedom.

For this week's post, I did some "research" on Pinterest and found this cute wreath made of tulle.  There was only one thing wrong with this wreath:  I am WAY too lazy to tie that much tulle!!  But it did remind me of a scrappy fabric wreath I attempted for Halloween last year.  I knew I had most of the fabric I would need, and knew where to get the rest of the supplies for CHEAP.  Here's what you need:

* I found this 9" wreath at the dollar store.  Perfect!  A little small, but that means less work.  :)

* Ribbon for hanging, if you choose (dollar store, again).  I have a wreath hook, so I didn't use mine.

* The stars I found at Joann's for $.29/each!  I only ended up using one.

* Fabric.  This is a great project to use your extra scraps of fabric.  I had all but the blue, which I found at Joann's in the Fat Quarters section.

This project is great, because there's no right or wrong way to do it.  I chose 3 different fabrics of each color.  I cut the pieces 1 1/4" wide and 9-10" long.  Some were thinner or shorter, depending on what scraps I had.  Anything shorter than 9" was a little harder to work with, but still doable.

Next, start tying!  I double tied one piece of each fabric, alternating between red and white.  If you look at the wreath as a clock, tie red and white from 12 o'clock to 9 o'clock (or 3/4 of the wreath).  Then tie your blue pieces the rest of the way.

You can nest the knots together if you don't want as much of the wreath showing through.  Or you can spray paint the wreath white before you start tying fabric.  (I did this with my Halloween wreath and it worked great!)


That decision might be the toughest part of this project.  :)  I liked it both ways, but decided to paint my little star and hot glue it on.  Multiple smaller stars could be cute too.

**THE GIVEAWAY**

Okay... now the fun part!  Leave a comment below answering one (or both) of the following questions:

* What do you like most about our blog?
* What would you like to see more of on our blog?

 If you aren't one of our Facebook friends, I'll also need your email address included in your comment (or you can email it to us at fivecraftysisters@gmail.com).  You have until Sunday night to enter.  Good luck, and Happy Memorial Day!!


Allison