Showing posts with label decoration. Show all posts

Thursday, January 17, 2013

Allison: Valentine Wreath Giveaway!!


*****  GIVEAWAY IS NOW CLOSED  *****

Hello!  I know... it's been too long.  But I have a fun way to make it up to you.  How about a give away?  I was looking through my Valentine's board on Pinterest, and found this cute wreath.  I knew I had the supplies to make it, so I attempted one myself.  A few months ago, I found some great 1/2 wreath forms at Target in their dollar section.  They're great, because they lay flat against the door.  I knew I'd have a reason to use them eventually.  It's that very thinking that has my crafting supplies busting out of every storage space of my house.


It took me about 40 minutes to wrap the wreath in yarn (10 minutes here and there), and not much longer to cut out 12 hearts from scrap felt I had from other projects.  I used a cookie cutter as my template and cut the heart out of a cereal box.  (We're real sophisticated around here.)

I used a tiny dab of hot glue to secure each heart in place, until I could wrap them with yarn.  It was such a fast and easy project!  I was going to write up a tutorial, but after I finished, I clicked on the pin that had originally inspired me, and found a great tutorial found here.  Go figure.  :)

So... here's the giveaway questions:

What's your favorite way to spoil your significant other on Valentine's Day?

Or...

What's your favorite way to be spoiled on Valentine's Day?

Leave a comment below, and Monday morning I'll randomly select a reader to win this cute, 9" Valentine's Wreath.  I hope you all have a great weekend!


Allison

Tuesday, October 16, 2012

Allison: Halloween Decorations

Hello again! I wanted to start my post by announcing the winner of the Halloween wreath giveaway from last week. And the winner is... (Drumroll, please)... Bethany!! To my question, "What is your favorite Fall craft or treat?" she responded:

"How about my favorite fall activity? I love going to the pumpkin patch! We always have so much fun. I love fall in the NW. Crisp, sunny days, the smell in the air, the leaves changing....it's the best!"

She made me particularly homesick for Oregon with that comment, but I won't hold it against her... too much. Congrats, Bethany! And a big thanks to everyone else who left a comment. We love hearing from all of you!

For this week's post, I'm being a little lazy. I'm going to share some ideas that I'm GOING to do, but haven't yet. But they were all so creative, that I wanted to share.


I love this first Halloween craft, because it's something that kids could help with. I think these little bats would be fun strung from trees in the front yard (or the cactus, in my case).  Here's where I found this idea.


I thought this next idea was really fun.  Using toilet paper or paper towel rolls, cut some "eyes" and insert a glow stick.  Then place them in bushes to shine like scary eyes in the night.  I've never seen this idea before, and with a 2 pack of glow sticks in the dollar section at Target, it's easy to accomplish. I found the idea here.


I kind of hate the water here in Arizona, which results in a lot of empty water gallon jugs in our recycling. So this next idea was a no-brainer. Those same dollar glow sticks would work great to line our front walkway Halloween night. I can't wait to see the end product! I found this idea here.


Last but not least, Pinterest helped me find this fun idea.  All you have to do is glue a magnet to the back of a plastic spider and stick them wherever you want.   Creeps me out just looking at it!  I only wish my door was made of metal.  I'm sure I can find somewhere to put them. Here's the original site for this idea.

So there you go! I'll try to take pictures of the final products Halloween night. What fun decorations do you have planned? I hope you all have a great week!!


Allison

Wednesday, October 10, 2012

Allison: Halloween Wreath and Giveaway

                                     ****************GIVEAWAY IS CLOSED*******************

Hello and welcome to another week!! It has been a busy one for my sisters and me. With travel and family obligations, sometimes posts don't happen. On that note, mine is a day late. But I actually have a craft to post!

I was walking up to my front door the other day and saw the wreath I made for this post. Now that it's October and almost Halloween, I figured it was time to switch it out.


I'm not going to repost the steps, since they're pretty much the same. But instead of patriotic colors, I bought some cute new fabric and raided my scraps to find all I needed to make this cute wreath. I love the freedom you have with scrappy wreaths to make it as crazy or "clean" as you want. I may end up adding a "boo" or something to make it more exciting. Then again, I might just leave it plain too. :)

I ended up having so many extra strips that I thought I'd do a giveaway this week. To be entered to win this Halloween wreath, you just need to answer the question below:


What's your favorite Fall craft or treat?


A view of the other side of the wreath.


The Giveaway will close Monday night, and I'll announce the winner in my post the next morning.  I am seriously missing the NW and their beautiful Autumn trees and weather. Help me feel even more homesick by reminding me what I'm missing. :) Have a great week!!

Allison

Wednesday, September 26, 2012

Sara Jane: DIY Gifts

I am one of those annoying people who has 99% of their Christmassing (yes, that is a word in my home) done December 1st EVERY year.  I do if for two reasons: (1)  I LOVE the entire process of buying/making gifts and then giving them to others and (2) So I can really enjoy the entire month of December and focus on the family traditions that we have created within our own little family.

During the year, when I am out shopping, I am constantly thinking of who would like what.  Two years ago, I had my children's entire Christmas done in January (there was a fantastic sale I could not pass up).  This year, however, I have been slacking soooooo, I thought I would share with you some of the projects I have recently started working on for Christmas.  I love doing homemade gifts, especially for my children, so I can personalize the gift for the person who will be receiving.  Here are a few that I've started....

1.  Car Caddy
2.  Doll with carrying case
3.  Mini Coloring Tote
4.  Magnetic Scrabble Board
5.  Little man ties
6. Sticky Grams (such a cute idea for grandparents!)

I just finished one super simple gift this weekend and wanted to share it with you.

I went to our local Habitat for Humanity ReStore this weekend looking for materials that would inspire me to do something crafty.  This store is one of my favorites!  Not only do they serve a pretty incredible purpose but they have random parts and pieces that you can't find anywhere else.  We got our beautiful claw foot bathtub at our ReStore for a steal!

Anyway....while there, I discovered their tile section.  After holding a tile for probably 3 or 4 minutes, I remembered seeing a coaster somewhere that a person had made from a tile and some modge podge.  Perfect!  I grabbed a few tiles (only $0.10 each!) and headed home.

For this coaster project, you will need, tiles (however many you want to make), mod podge (mine is homemade - Just a 50/50 mixture of Elmer's glue and water), decorative paper, felt, a clear high-gloss spray paint (not pictured), and a hot glue gun.


First, cut your paper so that the paper squares are just slightly smaller than your tile.  Next, paint your tile with a thin layer of mod podge.  Place your decorative paper on top of the tile/mod podge.  Paint another layer of mod podge over the decorative paper.  Allow to completely dry (I had them dry over night) .  Finally, spray a coat of clear high-gloss spray paint on top.  To finish off the coaster, cut out felt squares to line the entire bottom of the tile (I simply traced the tile onto the felt) and glue them on with the hot glue gun.  So simple and they turned out really cute.


There are so many ways that you could personalize these coasters.  I will be making some for a certain family member that will have pictures on top of the decorative paper.  Another fun thing you could do is to first paint the tile and then add paper/pictures.  Or, how about adding stickers to say something fun.  The possibilities really are endless.

Until next week...

Sara Jane

Wednesday, September 12, 2012

Sara Jane: Pumpkins!

Hi friends!

From now until January, be prepared for way too much excitement in my posts.  Like I told you last Wednesday, I LOVE everything about September, October, November, and December.  I love all the food, the decorations and the overall excited/giving spirit that most people seem to have.  

I'm not sure if it is the changing of the seasons or what but I have had way too much happiness in me the last few weeks.  Its the kind of happiness that all you want to do is turn the music up way too loud to sing and dance.  Yesterday, I tried to channel that happiness into something productive for the blog.  

We have had this huge pile of wood sitting outside of our house since July.  A lot of it is wood we picked up from my in-law's house, the pallets were delivered to our house by a friendly neighbor, and then there are just lots of scraps of wood from some remodeling we've been working on.  Hmmmm, what could I do with all this wood???  PUMPKINS!


This project was so easy.  I went through our huge pile of wood...


and found a few random pieces that I thought would make cute pumpkins.  I also I had my sweet hubby cut a few little pieces for the stems. 


Then came the painting.  I had a few little helpers for this part.  For their pumpkins, they painted then entirely orange.  For my pumpkins, I did the first coat white.  When that coat was dry, I painted an orange coat on top of the white.  For the stem pieces, I simply painted them green.

When everything was nice and dry, I distressed the wood with a piece of sand paper.  If you don't like that look then just omit this step.  Next, using my glue gun, I glued a piece of thin wire, which I curled, and the green "stem" to the top of the pumpkin.  I think they turned out pretty cute.  When I finally dig my harvest decorations out of the attic, I will decorate with leaves but for now, these will simply sit on my mantle as they are.  They brighten up my living room....I LOVE them!


I never feel like my posts are complete until I share with you a favorite recipe.  Today, I thought I would share with you a recipe my sister-in-law, Micky, gave me.  Gingersnap Pumpkin Pudding.  I have seen several recipes similar to this one but I have not liked any of them as much as I do this recipe.  It is always a hit when I have it at parties.  I use it mainly as a dip for gingersnaps or fruit although I am positive you could eat it by itself.  It is absolutely delicious.  We have it several times during the fall.  If you love all things pumpkin, you must try this gingersnap pumpkin pudding!


GINGERSNAP PUMPKIN PUDDING

Ingredients:
* 1 3/4 cup cold milk
* 1 package instant cheesecake or vanilla pudding mix (the small box)
* 1/2 cup canned pumpkin
* 1/4 to 1/2 teaspoon pumpkin pie spice
* 3 gingersnaps, crushed
* 1 cup whipped topping

Directions;

In a large bowl, whisk milk and pudding mix together for 2 minutes.  (I use my electric mixer for this part).  Stir in the canned pumpkin and the pumpkin pie spice.  Let stand for a few minutes or until soft-set.  Fold whipped topping into pudding.  Sprinkle the crushed gingersnaps on the top. 

There you have it folks.  Have a great rest of your week!

Sara Jane

Tuesday, July 24, 2012

Allison: Hidden Potential

Hello, again!  I'm just going to come right out with it: this post is going to be lame.  I know!  I'm not supposed to admit that, but it's almost noon and I haven't even started it yet.  That's not a good sign for me.  I usually try to have mine mostly done the night before I post.  But this has been a very pregnant week.  I'm SO SICK of the heat, and I'm feeling HUGE and my motivation has been a little low to be overly creative.  I've also been rushing to finish Norah's quilt, so there hasn't been a lot of free time for other crafting.  With that intro, I don't really expect you to stick with me for the rest of this post, but I'll assume a few of you will.  :)

One reason I really like Pinterest, is because it gives me "access" to countless creative people.  Through all their projects and pins, my perspective has begun to change a little when I look at ordinary objects.  I've started to be able to see their "hidden potential".  I've already shared a couple of projects that illustrate this point, like my revamping of an ordinary Wal Mart frame in this post.  The project I'm going to share today has been years in the making.  I originally bought this little shelf from Big Lots at least ten years ago when I was living in Utah.  Since then, it has moved many times with me, and spent a lot of time in storage or in the garage.  I never took it out of the box, but just knew that I'd use it someday.  This is a problem of mine; just ask my husband.  I always think I'll be able to use something eventually.  But in this case, it actually turned out to be true!

I kind of forgot to take a picture of the shelf before I painted it.  :)


When I decided that Isla's room needed a little sprucing up, I instantly thought of this little shelf.  Mostly because I could hang it out of reach of her curious hands.  But her room doesn't have much black in it, so I knew the color needed to change.  I'm a big fan of spray paint because it's relatively easy to use and gets the job done quickly.  So I sprayed it white, and added a little scrapbook paper as backing for the pictures, and presto... a completely different looking frame that matched my little one's room.  I love it now!  Isla also loves to look up at the pictures and I've enjoyed having a little shelf to display decor that Isla can't get to.  Did you miss my tutorial on the flowers?  Find it here.  I wish I could take credit for the adorable wooden blocks, but my friend, Lindsay, made those.  I love them!


So here's your creative challenge of the week:  Look around your house for things that you love, but aren't currently using.  Is there something you could do to tweak it enough to make it functional or more appealing as a decoration you'd display?  I know we all have stuff like this in our houses, we just need to see the hidden potential.  Thanks for letting me share this week, and taking a break from a more detailed post.  :)  Until next week, keep on crafting!

Allison


Wednesday, June 27, 2012

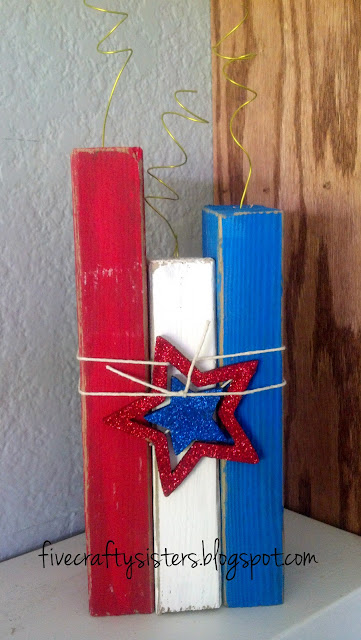
Sara Jane: Fireworks and a treat


Hello hello hello!

I love the Fourth of July.  Not only do we get to celebrate this spectacular country of ours but we get to blow things up.  Who doesn't enjoy doing that???

For my craft  you will need:


Wire cutters, wire (I used 22 GA), twine, paint (red, white and blue), a fancy star, sandpaper and wood.  The wood can be any size you like.  I used an old 2 x 4 piece of wood I found at my in-laws house and cut it into 3 pieces - a 10 inch, an 8 inch and a 9 1/2 inch piece.  (AND just in case you're wondering....I CUT the wood.  This is huge for me because I usually just have my hubby do all the work when it comes to power tools.  I'm now looking forward to my next project.)

First, paint your wood.  I like a more distressed looking piece of wood so I only did one coat.  If you want a more solid color, do two or more coats until it looks how you want.  Again, since I like the distressed look, when the paint was dried, I took a piece of fine sandpaper and lightly sanded the corners.

Next, I cut three pieces of wire.  I first tried the silver wire but you could hardly see it so then I tried the gold wire and it was exactly what I wanted.  Each piece of wire is several inches long.  I cut it long enough to be able to manipulate it and still have length.

Next, I drilled 1 hole in the center of the top of each block of wood.  Each hole is approximately 1 inch deep.  Use your smallest drill bit when doing this.  When your hole is done, stick the wire in.  If you are having a hard time getting it to stand up, maybe try a small dab of hot glue.

Finally, wrap your twine around the blocks of wood and decorative star.  Does it look something like this....


 Finally, everyone (except my Penelope) loves to watch fireworks, right?  Why not have a tasty snack while you are enjoying your Fourth festivities.


Simple Caramel Popcorn

This recipe is a favorite for movie night at my house.  The best part about it is that there is always left over caramel to be used to dip apples in, drizzle over a yummy spice cake, or to just eat with a spoon, like I do.  I know a lot of people like the kind of caramel corn that is baked in the oven.  If you are one of those people, this is probably not the recipe for you.  This caramel popcorn is a delicious mess.  My kids usually end up having sticky hands, faces and hair when they are done with this treat.  We like a good mess around here.

Enjoy!  

Ingredients:

1/2 cup butter
2 cups packed  brown sugar
1 cup light corn syrup
2 T water
1 (14 ounce) can sweetened condensed milk
1 T vanilla extract
3 bags of microwave popcorn.

Directions:

Pop popcorn.  I tend to use microwave popcorn because it is so convenient.  Use light butter flavor.  The full butter flavor just is too much with this recipe.  If you want to use air-popped, it tastes just as yummy :)

Combined all ingredients, except vanilla, in a large sauce pan over medium high heat.  Stir until butter melts.  Watch the mixture carefully as it can burn quickly.

When the mixture comes to a soft boil, continuously stir for 3 minutes to dissolve the sugar.

Take the pan off the heat and add vanilla.  Stir until combined.

I have found that the easiest way to combined popcorn and caramel is to do it in a LARGE pan.  I like to use my roasting oven pan.  That being said, pour 2 cups of the caramel over the popcorn and mix with a large spoon (I use a spatula...easier to clean).

Save remaining caramel in an airtight container in the refrigerator.  It saves pretty well for a few weeks.

*NOTE*

Most of the recipes I make are kid friendly in that the kids can help make them.  THIS IS NOT A KID FRIENDLY RECIPE!  Please make sure you know where your little ones are when you are making this recipe (and whenever you are using the stove/oven).  The caramel is so hot and can do some major damage in very little time.

Happy Fourth of July!

Sara Jane

Tuesday, June 19, 2012

Allison: Party Ideas & A Giveaway!!

**Giveaway is now closed**

Hello again!  I can not believe how fast the weeks are flying!  I feel like I just posted my weekly post, and here we are again.  As I enter my 30th week of my pregnancy, and another week of temperatures over 100 degrees here in Arizona, I'm not too sad that time seems to be flying.  :)

This is a special week in the history of our blog.  If you all continue to view our posts, we should hit our 5000th view sometime this week!  I can not believe that!  It has been so fun to stretch myself creatively and to have an excuse to stay better connected with my sisters.  So to celebrate this milestone, I'm going to have a giveaway that will start today and end tonight!  It's a quick one.  That's because I think we may see another give away from another crafty sister...

When I had my daughter, it seemed to ignite the crafting gene that lay dormant within me for thirty-one years.  As her first birthday approached, I began to scour the Internet in search of the cutest ideas, most creative favors and most beautiful cakes.  In other words, I totally stressed myself out, trying to make this birthday (that she wouldn't even remember) the best of her life.  Here's some of what I did.

For Isla's birthday, I decided on a princess theme.  The cake was pink, the decor was pink... lots of pink.  Probably my favorite part of Isla's party, was the party favor that I made for each of the kids that attended.  I found this wand online and thought it was adorable!  I considered putting together a tutorial of how it was made, but the one I found here couldn't have been easier to follow.  I LOVED how they turned out, and the kids seemed to enjoy them too.

A month later, I threw a baby shower for my good friend, Chiara.  She and I had talked about different themes, but I was secretly pushing a flower garden theme so that I could share my new favorite craft.  But before I got started on the decor, I had to focus on the invitations!

I had seen this invitation idea before, but wanted to make it my own.  So I came up with a template and started to play with the decorations.  I love how they turned out and was so glad that Chiara liked them too.


The diaper cake... oh, the diaper cake.  This was my first attempt at making this fun center piece, and it actually wasn't as difficult as I thought it would be.  My poor husband had to help me hold the diapers a few times, but besides that, it came together pretty easily.  I simply wrapped the diapers around and around each other (with an empty toilet paper roll in the center).  After I had reached the desired size, I stretched a large rubber band to secure the diapers.  To finish it off, I wrapped a folded receiving blanket around each level of diapers and secured each with a cute ribbon.  To add a little extra something, I decorated the cake with my favorite little fabric flowers.  The flowers became my main decoration at the shower.  I thought they looked so girly and cute.  After the shower, I sent at least one flower home with each guest as a favor.  They worked perfectly.  A couple of weeks ago, I shared the tutorial of how to make them here.


Finally, the best part of every party... THE FOOD!  Chiara is Italian, and requested some kind of version of tomato caprese.  I found a fun arrangement of fruit and had to use my good friend Brittany's amazing cheese ball recipe (which I think I'll save and share later.  So mean, huh?).  It was fun to plan and prepare for this shower, but it was even more amazing to see how much fun Chiara was having.  She was so excited for the arrival of her little Claire, and I was so glad that I got to be a part of the celebration.  Love you, Chiara!!


So there you have it!  Some of my favorite party ideas, mostly "borrowed" from other people.  :)  Those are the best ideas.  So now to the fun part...

**THE GIVEAWAY**

Alright... here's the deal.  You could take home these three adorable little wands for the princesses in your life, if you leave a comment below on the following question:

Why do you like to craft/create?  If you don't like to craft, why?

This is a question I've been thinking about a lot lately, and would love to hear your thoughts.  Comments left before midnight tonight will be entered in a random drawing for the wands.  Don't forget to sign your name to your comment.  Good luck, everyone!

**

Etsy shop grand opening & Saturday's Market

One final announcement before I end this eternal post.  Five Crafty Sisters has officially opened their own Etsy page!  Some of the crafts/projects you see on our posts will now be available to buy (in case you'd rather buy them than make them.)  So far, Sara and I are the only sisters selling, but we're hoping to convince the others soon.  Here's the address if you want to take a peek:


We're excited to be able to share our creations with our blog and Facebook friends.  One advantage our readers have, is that you probably know us.  And if you're local to the buyer, we can most likely just deliver whatever you buy instead of having to pay and wait for the shipping.  Not a bad deal!  :)

We will also be opening a "Saturday's Market" soon.  This will be a post on Saturdays that will either feature items that we're selling on Etsy, or introduce new items that will be available in our shop.  We're excited to take this new step.

Thanks for reading, and I hope your Summer parties are fun and full of great ideas!  Have a great week!!


Allison


Tuesday, May 29, 2012

Allison: "Gardening" according to Allison

Hello again!  If I can get my drooling under control after seeing Lisa's amazing zucchini bread, I'll start my post.  Okay... I'm good.


As Lisa mentioned, this week we're gardening!!  She also mentioned that my parents have an amazing garden.  I have always loved our backyard, but especially during Spring and Summer.  I have taken many pictures over the years of its beauty, and love the serenity that can be found there.  Since I can remember, we've had a HUGE vegetable garden.  I have many memories of weeding and watching my parents care for this space.  After a few years, they converted a large portion of this area into a flower garden.  I appreciate the time and energy that my parents have put into making their yard a place of beauty.

Courtesy of Melissa Gallo


But like Lisa confessed, I did not get this gardening gene passed on to me either.  I seem to kill everything living that enters my home.  I can look up right now and see a Mother's Day plant that has been struggling for its life near the sink, and fear for the survival of the orchid plant my husband gave me the same day.  It's okay... I accept this flaw about myself.  That being said, I thought my take on this week's theme was a little sneaky, and is probably considered cheating.  So be it.

A few years ago, I found these adorable little fabric flowers online.  I had seen them on multiple sites, but had never seen a tutorial on how to assemble them.  I figured it out, and thought I'd pass that process on to all of you.  The flower pictured is actually from a baby shower I organized last year, and only shows the four-petaled version.  I will be making a flower with five petals.  The process is so easy.  Here is what you'll need:

The basic supplies include: scissors, scrap fabric, marker/pen, yo-yo maker (optional), needle and thread and stuffing (which I forgot in the picture, but is VERY important).

If you'd like to put your flower in a pot (as pictured above), you'll need floral moss, tape and styrofoam (I found all of those at The Dollar Tree), wooden dowels (the size depends on the size flower you make), and a pot (not pictured).


These can be as basic or as complex as you want to make them.  I almost always go for basic.  Here are the steps:


Step #1- Trace 5 circles from one fabric type (for each petal), and 1 circle from a contrasting fabric (for the center of the flower).

Step #2a- If using a yo-yo maker, skip step one and cut around yo-yo maker and begin stitching.  Otherwise, begin a basic basting stitch around the edge of the circle.

Step #2b- This is how your fabric should look after stitching around the edge.

Step #3- Insert enough stuffing to cause a little resistance when thread is pulled tight.  Secure thread by stitching through the center multiple times.  Tie a knot to complete petal.


Step #4- Thread the five petals together by stitching through the middle of each ball.

Step #5- I'm a big fan of the glue gun, so I glued the middle ball to the 5 petals.  It can also be stitched in.  Cover a 1/8" wooden dowel by placing a small amount of glue on the tip, and wrapping floral tape from top to bottom (securing with more hot glue).  Finally, secure the dowel to the flower by gluing the tip and inserting it between two petals.

That's it!  Pretty easy, right?  I've also made larger flowers and used a 1/4" dowel (found these at Joann's).  I love mixing smaller flowers with bigger flowers in the same pot.  So fun!

I hope you've enjoyed my type of gardening.  Can't wait to see what Sara has in store for us tomorrow!  She actually knows how to keep plants alive.  See you next week!!


Allison


Tuesday, May 15, 2012

Allison: Patriotic Wreath Tutorial and Giveaway

  **Giveaway is now closed**
Wreath is available in our Etsy shop: http://www.etsy.com/shop/fivecraftysisters

Hello, again!  I hope everyone had a relaxing Mother's Day!

I'm so excited for this week's theme!  I LOVE Memorial Day!  I consider myself a very patriotic person, and relish any opportunity to be reminded how blessed I am to live in this free country and to celebrate all those who protect/have protected that freedom.

For this week's post, I did some "research" on Pinterest and found this cute wreath made of tulle.  There was only one thing wrong with this wreath:  I am WAY too lazy to tie that much tulle!!  But it did remind me of a scrappy fabric wreath I attempted for Halloween last year.  I knew I had most of the fabric I would need, and knew where to get the rest of the supplies for CHEAP.  Here's what you need:

* I found this 9" wreath at the dollar store.  Perfect!  A little small, but that means less work.  :)

* Ribbon for hanging, if you choose (dollar store, again).  I have a wreath hook, so I didn't use mine.

* The stars I found at Joann's for $.29/each!  I only ended up using one.

* Fabric.  This is a great project to use your extra scraps of fabric.  I had all but the blue, which I found at Joann's in the Fat Quarters section.

This project is great, because there's no right or wrong way to do it.  I chose 3 different fabrics of each color.  I cut the pieces 1 1/4" wide and 9-10" long.  Some were thinner or shorter, depending on what scraps I had.  Anything shorter than 9" was a little harder to work with, but still doable.

Next, start tying!  I double tied one piece of each fabric, alternating between red and white.  If you look at the wreath as a clock, tie red and white from 12 o'clock to 9 o'clock (or 3/4 of the wreath).  Then tie your blue pieces the rest of the way.

You can nest the knots together if you don't want as much of the wreath showing through.  Or you can spray paint the wreath white before you start tying fabric.  (I did this with my Halloween wreath and it worked great!)


That decision might be the toughest part of this project.  :)  I liked it both ways, but decided to paint my little star and hot glue it on.  Multiple smaller stars could be cute too.

**THE GIVEAWAY**

Okay... now the fun part!  Leave a comment below answering one (or both) of the following questions:

* What do you like most about our blog?
* What would you like to see more of on our blog?

 If you aren't one of our Facebook friends, I'll also need your email address included in your comment (or you can email it to us at fivecraftysisters@gmail.com).  You have until Sunday night to enter.  Good luck, and Happy Memorial Day!!


Allison